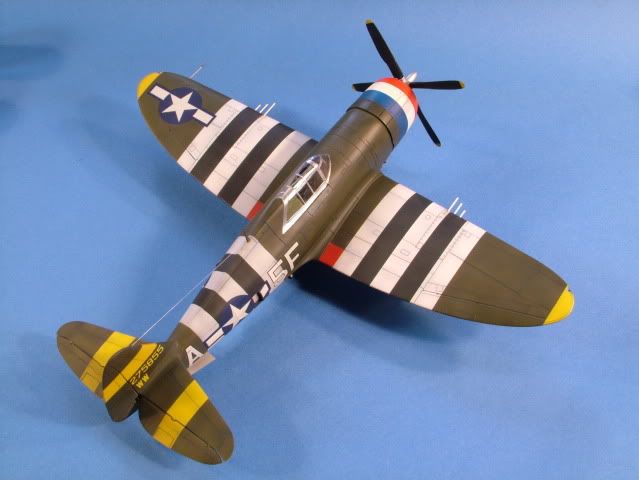
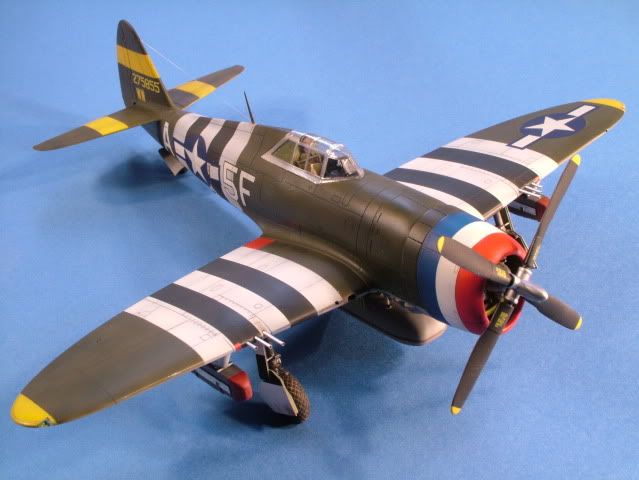
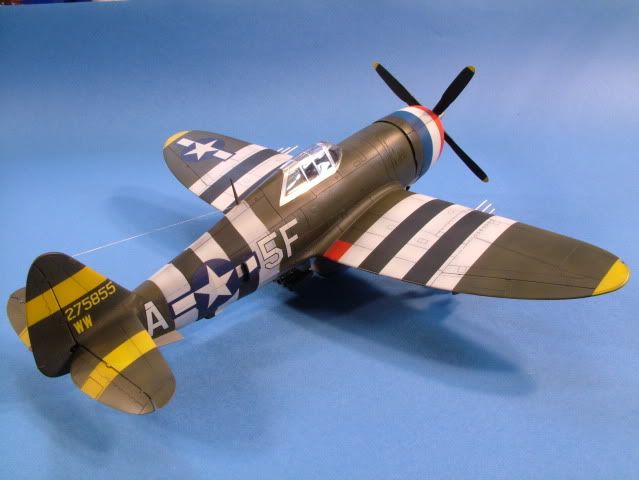
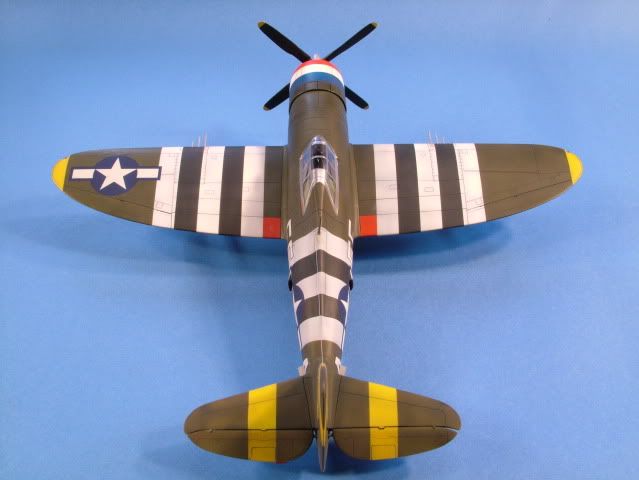
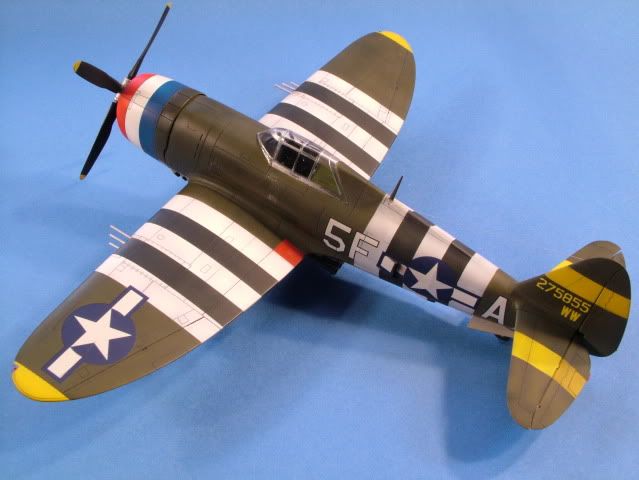
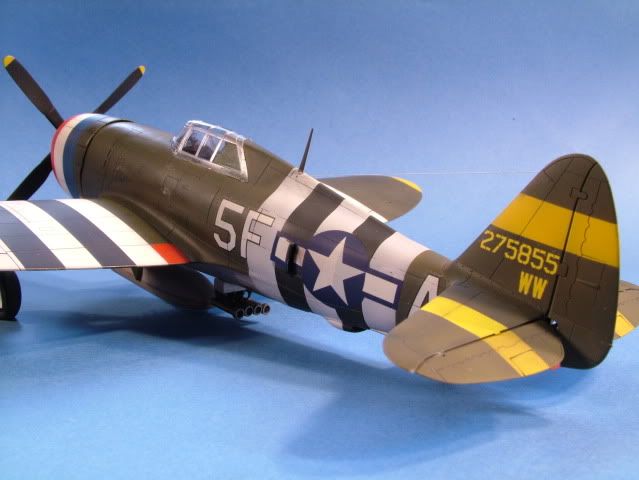
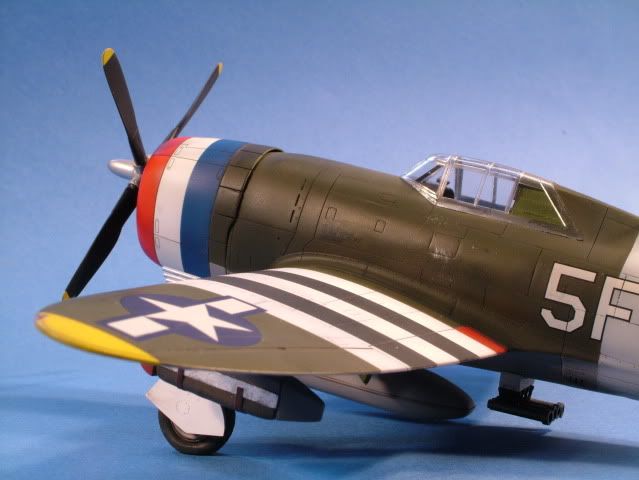
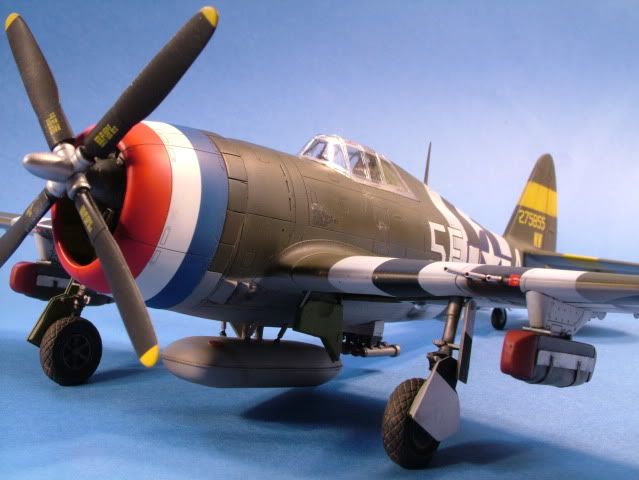
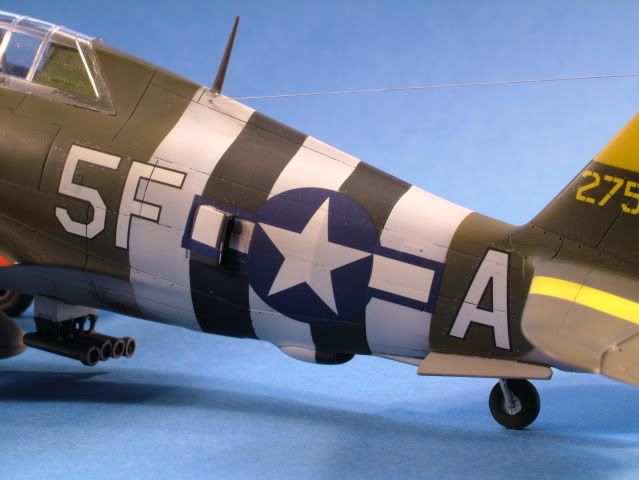
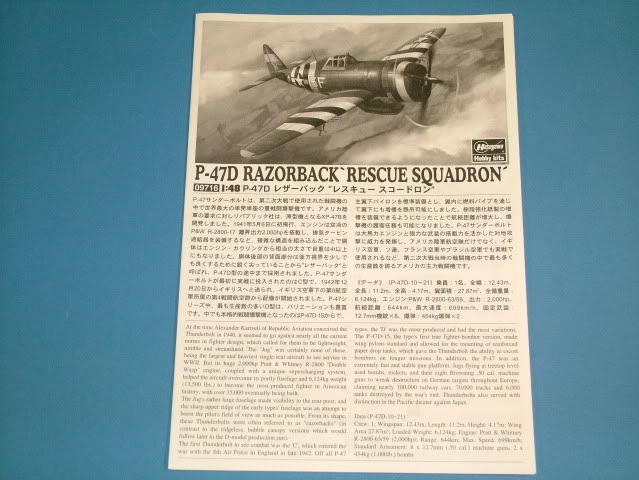
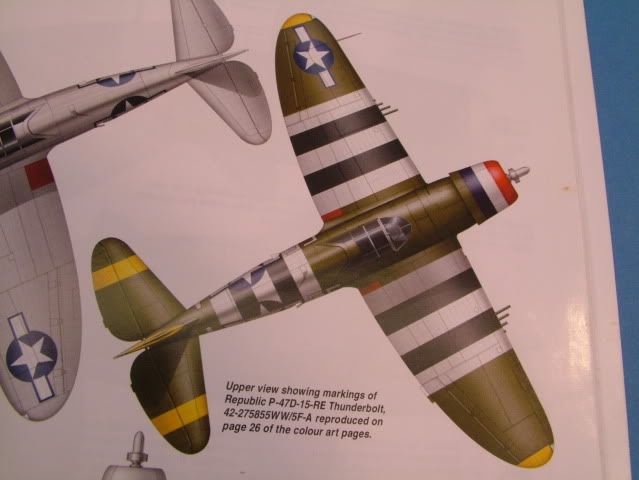
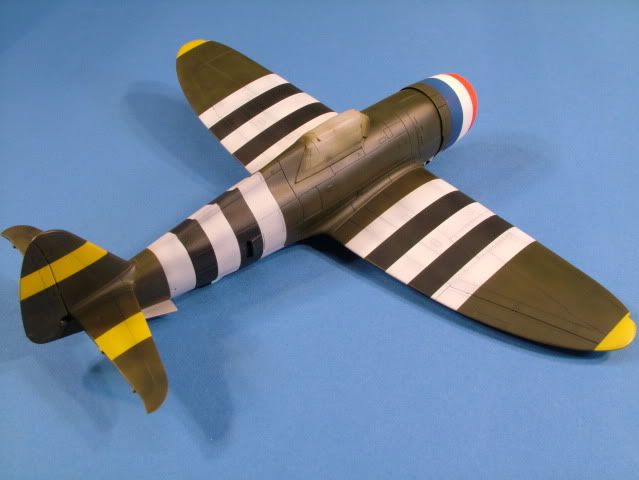
P-47D Razorback - Boxted UK 1944
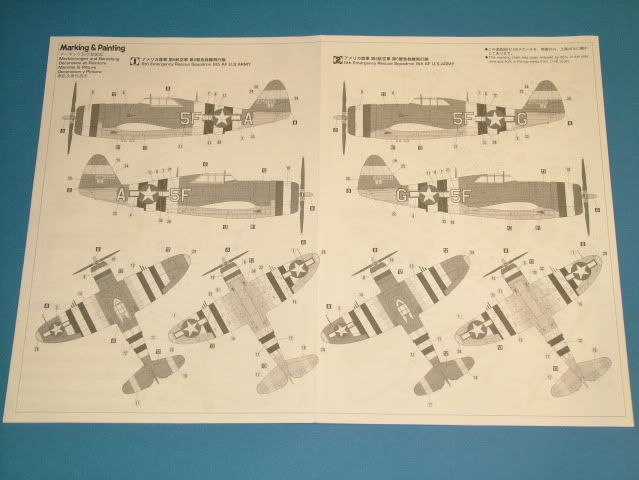
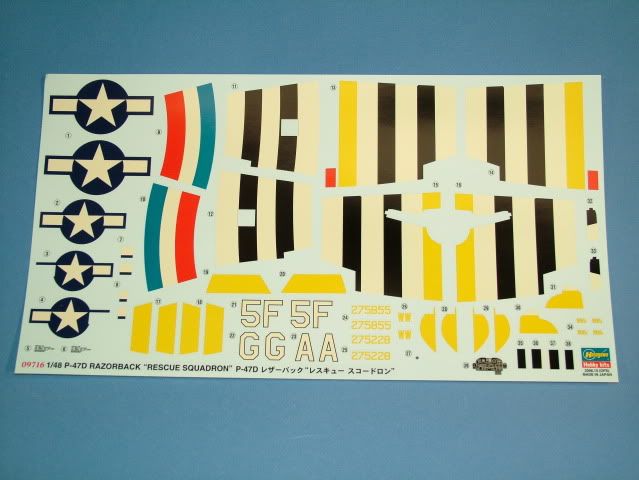
1:48 scale limited release from Hasegawa Models kit #09716, of a P-47D variant. This particular scheme is the Co’s plane designated as 5F*A of the 5th Rescue Squadron. It was one of the most colorful; and some might think most “gaudy” P-47 schemes of WWII.
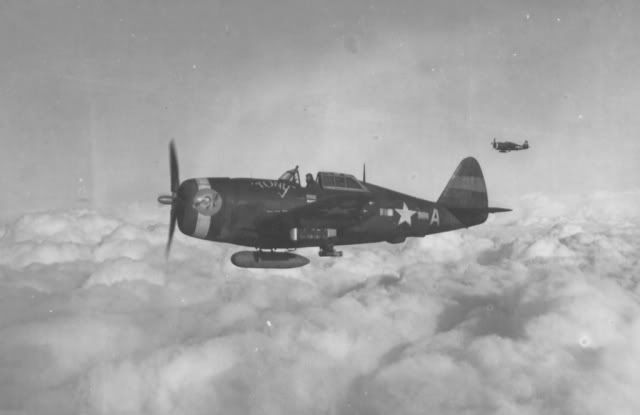
The USAAF realized that they needed an Air Sea Rescue capability but wanted it quickly and knew that it took time to set up a new unit. As a result they formed an informal unit called Detachment B, 65th Fighter Wing. As they were an informal unit they had to scrounge equipment from other units and so ended up flying Thunderbolts that were past their prime and were called "war weary". They flew their first operation in May 1944 and then moved from Boxted to Halesworth in January 1945. Their role was that they flew a patrol and then were directed towards aircraft in trouble. They could then either escort them home or, if they had to ditch, drop a dinghy to the crew and direct rescue ships to them. The unit was later formally designated the 5th’rs.
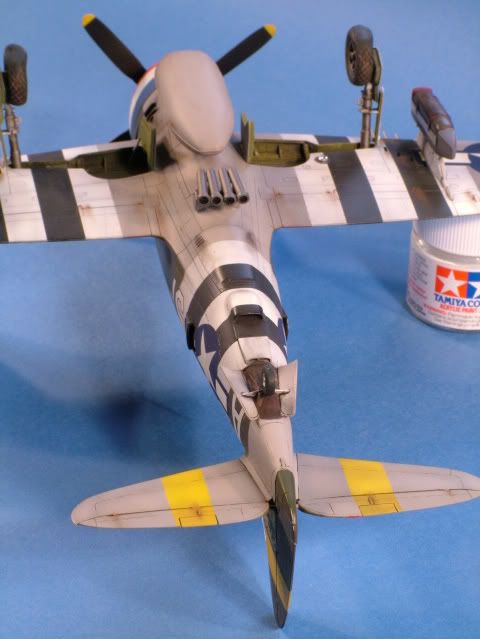
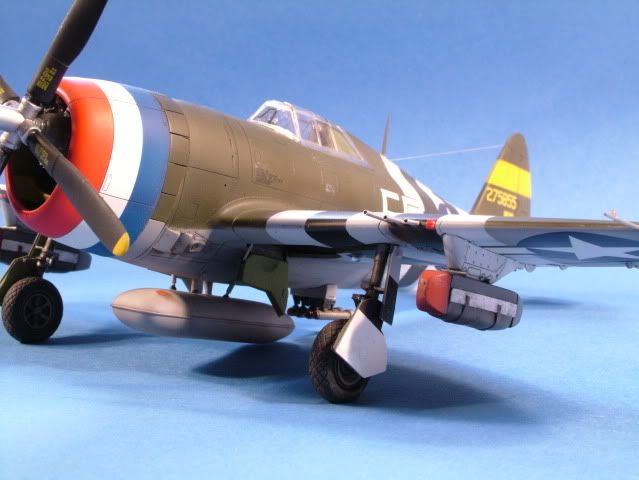
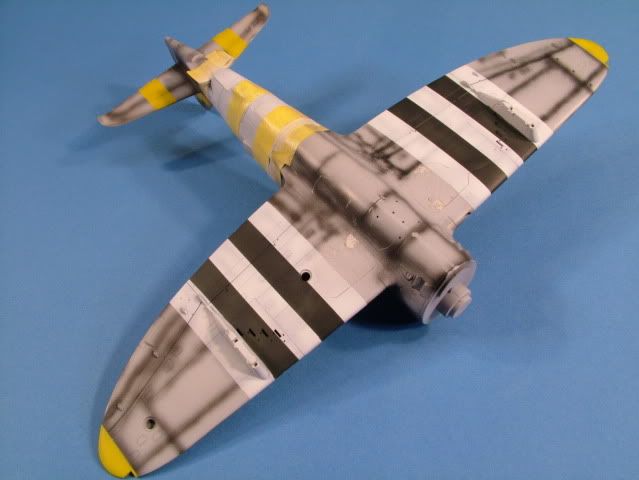
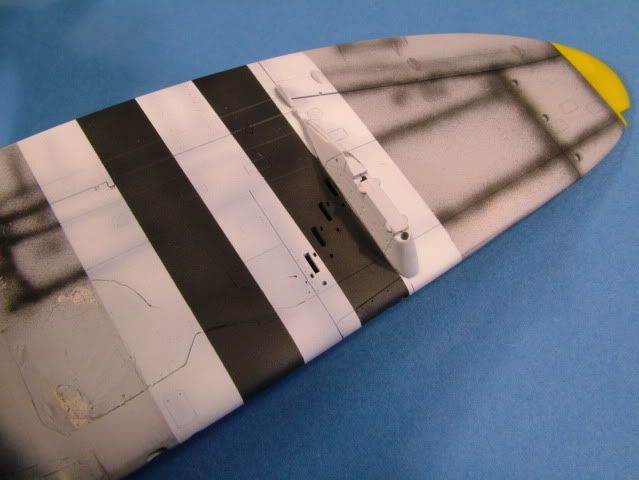
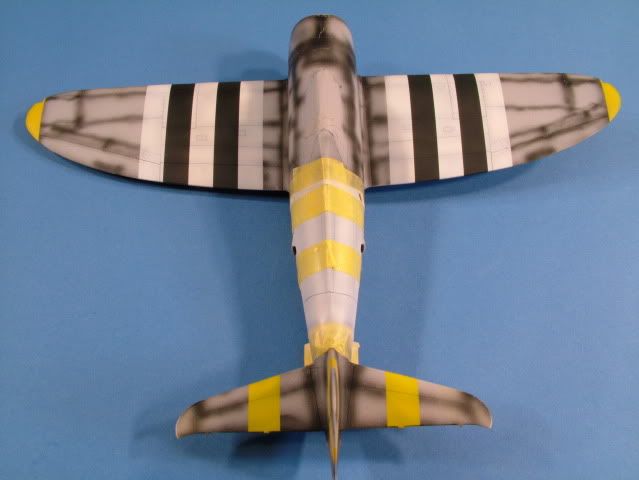
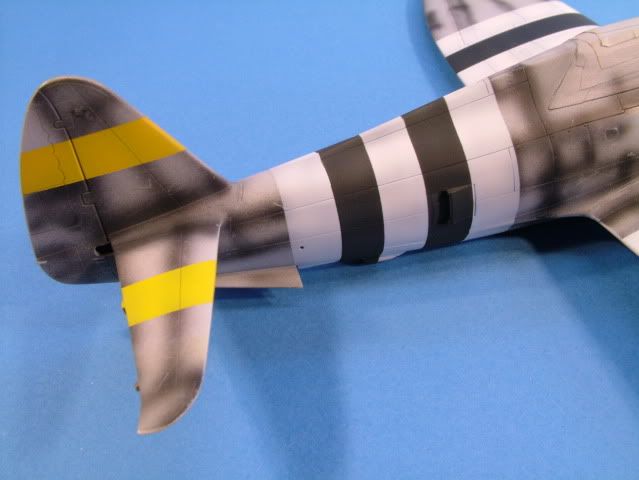
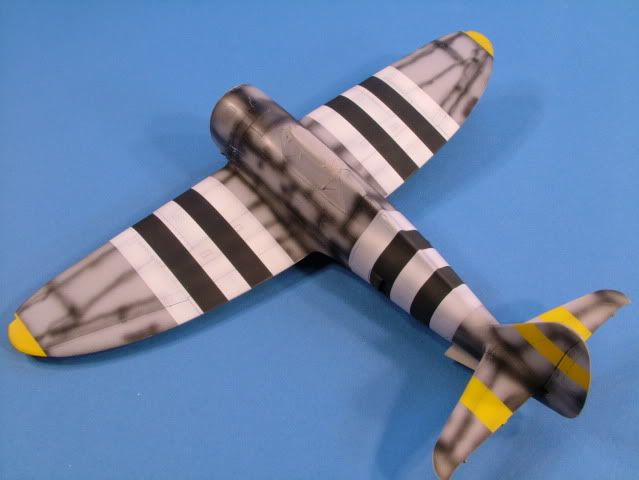
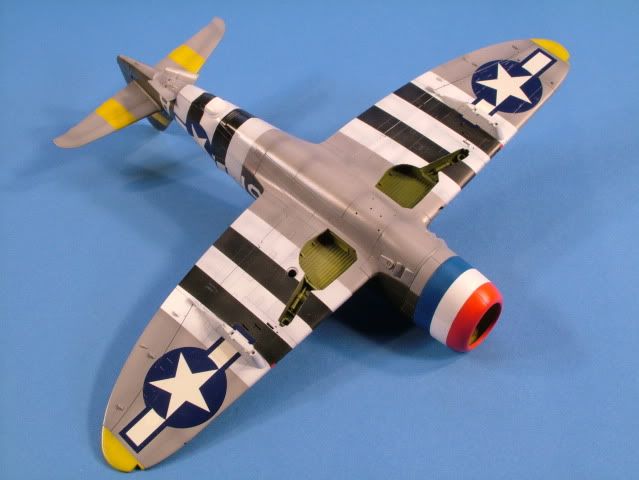
The most prominent feature of this particular scheme are the D-Day invasion recognition bands and the yellow marker bands, plus the Red/White/Blue Squadron Nose markings. The canopy frame was left in a natural metal finished state.
References used:
Web article http://www.boxted-airfield.com/richards/page6.html
Web Article little friends: http://www.littlefriends.co.uk/gallery.php?Group=5ers
Web Article: http://www.mission4today.com/index.php?name=ForumsPro&file=viewtopic&t=364
Squadron/Signal in Action Series: P-47
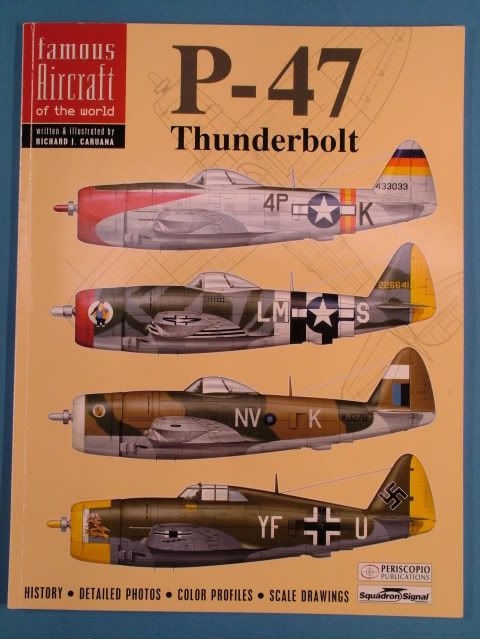
Squadron/Signal: Famous Aircraft of the World P-47 thunderbolt
Two rare pictures of “Tony” clearly depicting the nose art of the Unit Crest and “Tony” script in front of the wind shield are shown below. It appears that 5F*A underwent multiple over paintings, in the first picture the D-Day Invasion stripes are missing in the fuse and wings, plus the yellow inner bands.
In the second picture the Yellow unit marking bands are missing on the outsides of the top wing. However the yellow main wing tips and yellow band on horizontal tail surfaces can be seen as well as now the WW and serial number 275855.

Hasegawa Kit Box Art:

Comments about the planned build:
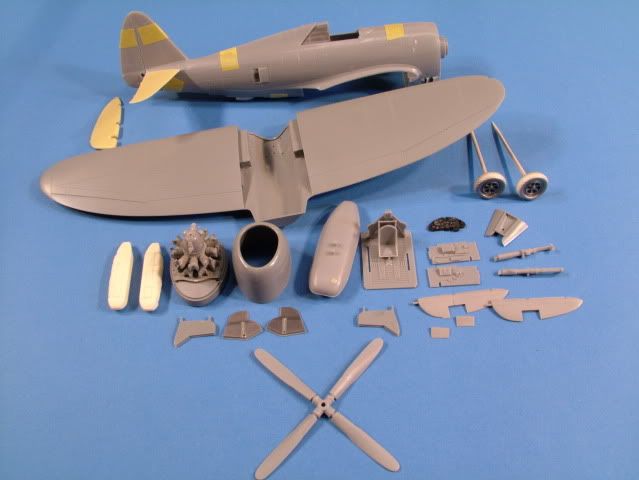
I will be enhancing the kit cockpit with the addition of PE instrument panels and seat belts from the Eduard set, also some exterior parts will be enhanced with that set. The gear will be enhanced with some break lines and additional PE parts inside of the wheel wells. The kit engine will be replaced with a resin engine from Quickboost and this will be enhanced with some ignition wires. The control surfaces will be shown in a gentle deflected state for the Rudder and Elevators. Not sure if I will do anything to the Ailerons although the parts are included in the resin set. The wheels will be replaced with bulged Block Tread types from True Details. The load out will be made by using the now long OOP Loon Models resin parts to build the rescue dinghy and the smoke flares. The kit’s Pitot tube and gun’s will be fashioned out of stacked brass tubing. Most likely will “tape over” 2 gun ports as to depict a lighter load-out.
The airframe will be readied for painting by utilizing Squadron’s Plastic Prep first and rubbed with various polishing sponges from MDC. The complete airframe will be sprayed with Mr. Surfacer 1200 from a rattle can.
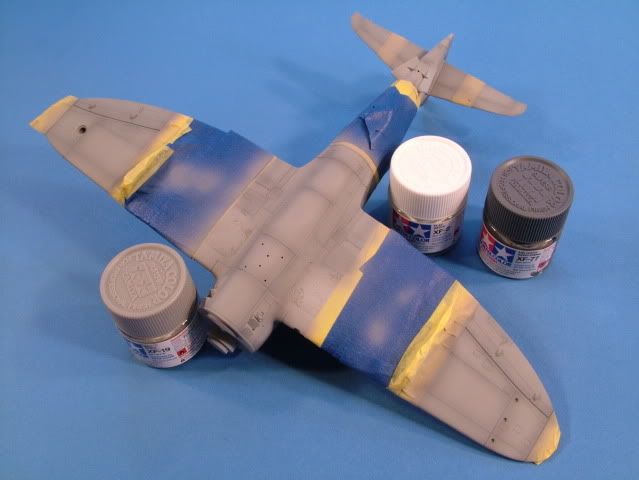
The main color of OD Green will be painted with Tamiya Khaki Drab XF-51 and a slight mix of Tamiya JA Green XF-13, and then several panels and areas will be post shaded with slightly darkened and slightly lightened versions (potentially using XF-58 and XF-67.
At specific areas of normal wear, I plan to apply some silver with the dry brush sponge technique and a silver pencil for some scratches.
The undersides will be pre-shaded with Tamiya Flat Black then over-sprayed with Tamiya XF-19 light Grey. Some post shading of lightened areas will be performed as well.
Planning to paint the Invasion Stripes and the Yellow ID bands, plus the Red/White/Blue Unit cowl will be painted as well rather than using the large decal sets.
Bits of worn surfaces to be picked out with little dabs of Testors Model Master metallic paint for the propeller leading edges, the yellow leading edges slightly weathered with OD coming through.
Some boot scuffs on the walk ways to the cockpit and wear and there around hand holds to the cockpit glass will be simulated with a black artist pastel stick, fuel stains on wings and radiator leakage will be simulated with weathering powders from bragdonent.net.
A clear gloss coat of Testors Model Masters will be applied in preparation for the decals and snuggled down with solve- a-set decal solution if need be. Once the decals have been applied another Gloss clear coat will be applied to seal the decals in completely. The next step will be to apply ProModeller clay based washes (Dark Dirt) to accentuate the various panel lines and general weathering. Finally a semi-flat to flat coat will be applied to finish out the build.
Some exhaust staining around and aft of the exhaust tubes will provide some additional detail highlights. The exhaust tubes will be detailed with Mig Pigments and weathering powders from Tamiya and Bragdonent.com.
Antenna wire will be fashioned from invisible fishing wire and painted dull silver. Small blobs of Super Glue will be used to make up the insulators and cable tensioners.
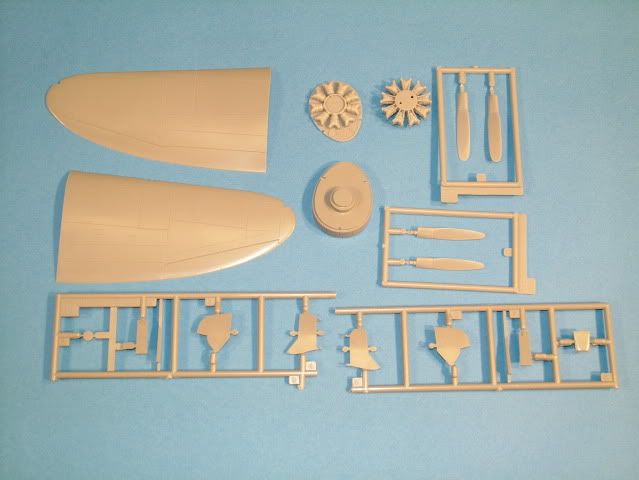
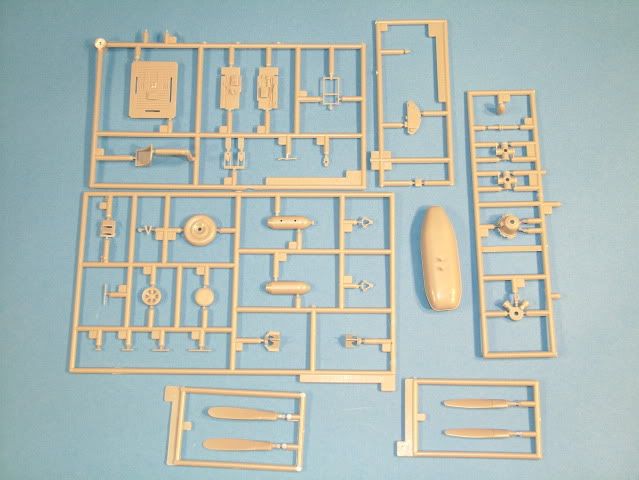
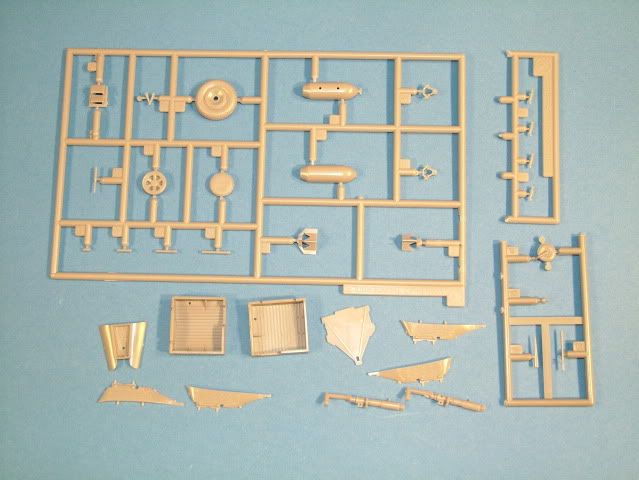
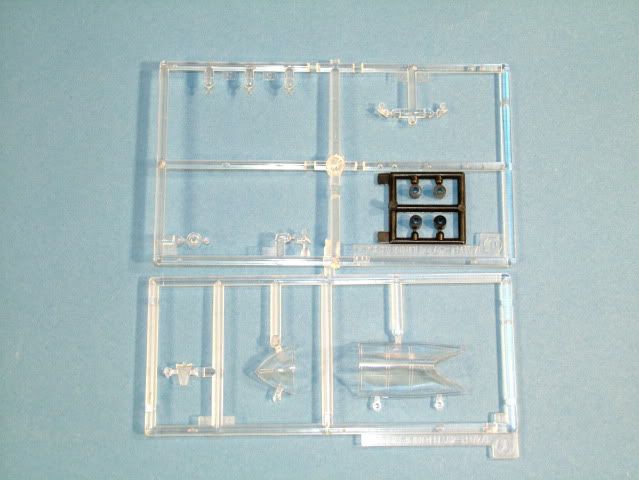
Kit used:
- Hasegawa kit number: 09716
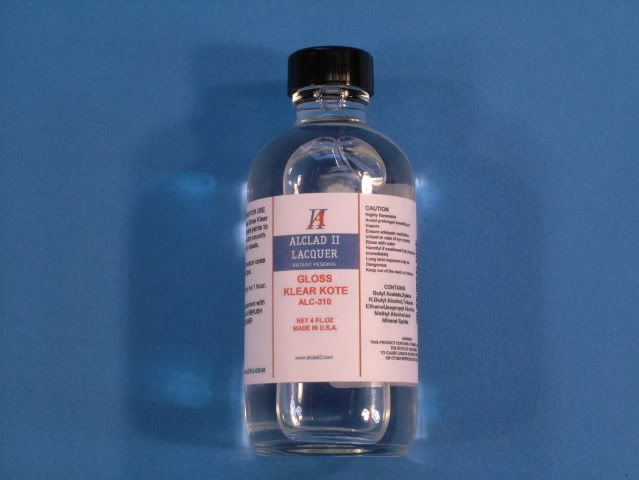
Paint Used:
- Tamiya Acrylic, Testors Model Master Metalizer, and Alclad II
References & aftermarket products used:
- Aires control surfaces 4044
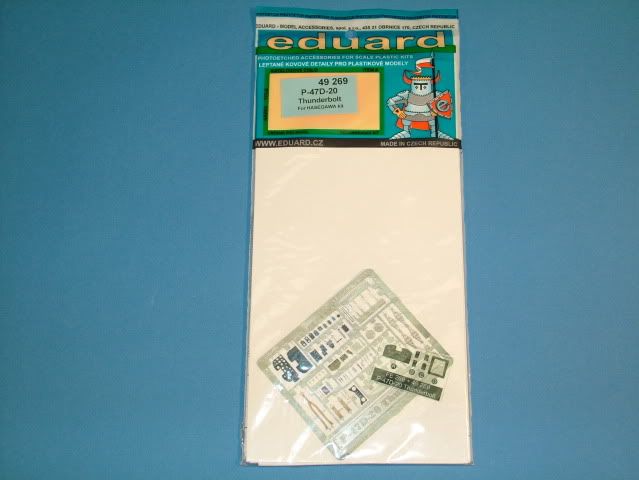
- Eduard PE set 49-269
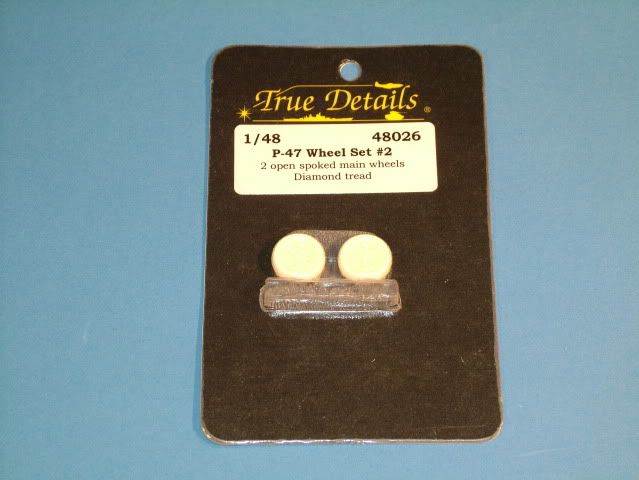
- True Details Wheels 48026
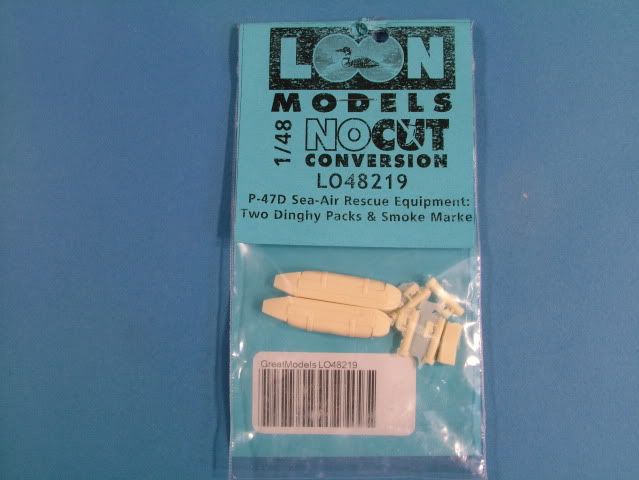
- Loon Resin LO48219
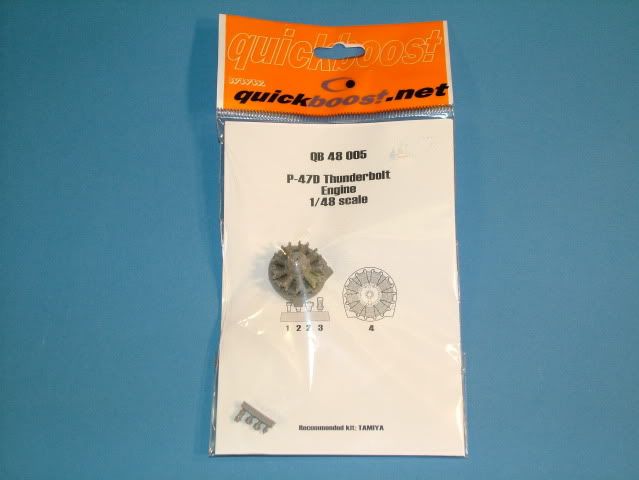
- Quickboost engine
- Eduard Quick Mask
- Weathering Powders by: bragdonent
A special thank you again to Mike Smith & Fred at Colpar Hobbies for their kind and endless support while searching and chasing various aftermarket vendors whilst locating all the “bits and pieces” that make up my builds. A special mention is made to the staff of http://www.greatmodels.com for their persistence to locate the Loon Models parts. A full year went by searching high and low but they came through in flying colors.
Tools used:
- Delta Electric variable speed Disk Sander – used to remove casting blocks for Resin
- H&S Evolution 2 in 1 and H&S Infinity Solo Airbrushes
- Dental Tools for scribing panel lines , P Cutter & Scalemodelsport.com Scriber
- Mission Models cutter
- JLC Razor Saw
- RB Productions Riveting Tool
- Xuron Sprue Cutter
- Small curved scissors
- X-Acto Scalpel blade(s)
- The “Bug” PE bender
- Pin Vise
- Pin drill bitts
- Cocktail sticks
- Cotton Buds (lots)
- Scribing Templates
- Tamiya Masking Tape various sizes
- Various sanding sponges from MDC & ProModeller.com
- Bow Sander by Flexifile
- 3-M White Tack for masking off wheel bays, intake(s) and engine cowling
Glues & Putties used:
- Zap Super Glue medium thick
- Zap Super Glue Kicker
- Tamiya Extra Thin and Thick Cement
- Gator Glue by Gator Grip
- Mr. Surfacer 500 and 1000
- Mr. Surfacer 1200 Spray Can
- Polly Scale – Plastic Prep
Paints Used:
- Tamiya XA-20 Thinners
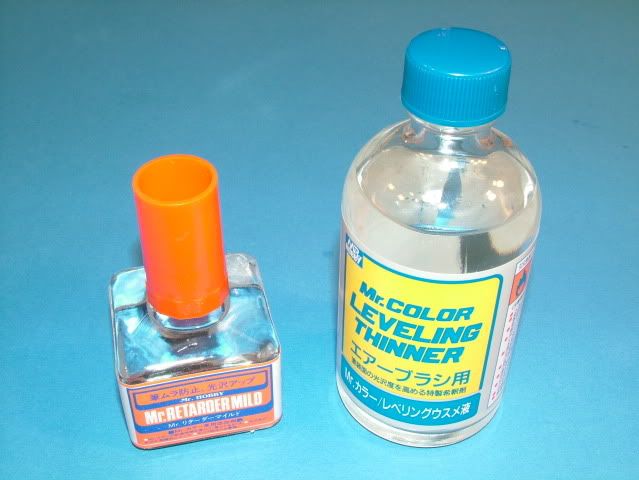
- Mr. Color Leveling Thinner
- Mr. Color Retarder
- Tamiya XF-1 Flat Black
- Tamiya XF-2 Flat White
- Tamiya XF-3 Flat Yellow
- Tamiya XF-7 Flat Red
- Tamiya X7 – Gloss Red
- Tamiya XF-10 Flat Brown
- Tamiya XF-19 Flat Light Grey
- Tamiya X- 25 Clear Green
- Tamiya X-27 Clear Red
- Tamiya XF-69 NATO Black
- Tamiya XF-62 Olive Drab
- Tamiya XF-13 JA Green
- Tamiya XF-12 JN Grey
- style="FONT-FAMILY: 'Arial','sans-serif'; FONT-SIZE: 10pt">Tamiya XF-58 Olive Green
- Tamiya XF-67 Nato Green
- Alcad II Aircraft Aluminum
- Alclad II Aircraft Steel
- Alclad II
- Model Master Flat Lacquers
- Micro Sol & Set decal solutions
- Future - for cockpit glass and instrument gauges
Final detailing:
- Promodellers Dark Dirt Weathering Wash
- Bragdonent weathering powders
- Tamiya Weathering powders Master set C&D
- Mig Pigments
- Gallery “artists” soft Pastels
Assembly booklet:
Color Call Out's of the 5th:
Fuselage, Cowl, main wing and stabs:


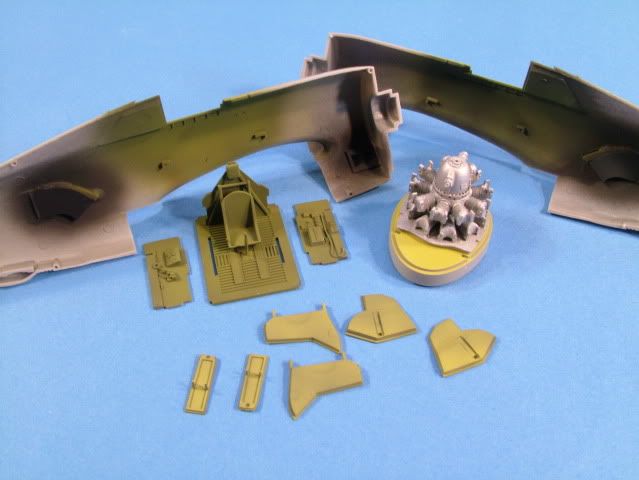
Aires control surfaces:

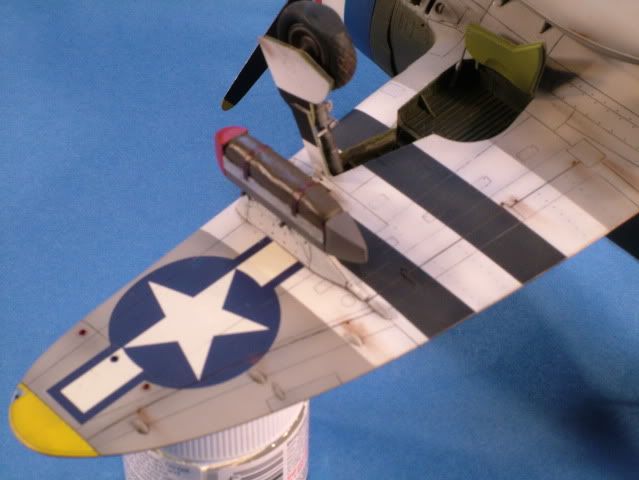
Loon Models Rescue dinghy and smoke marker flares:
One of my references to be used for the build:
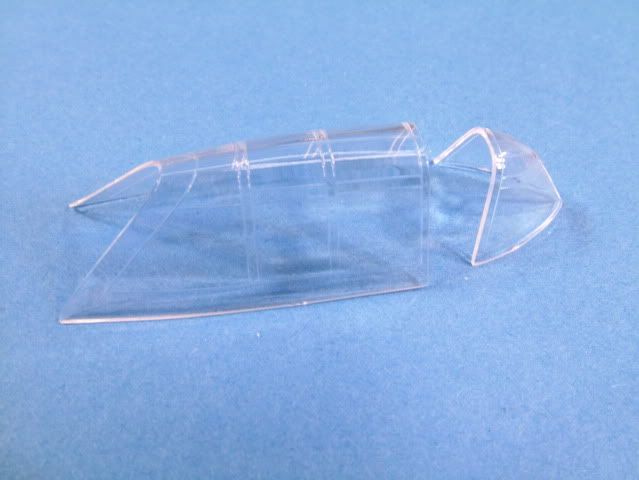
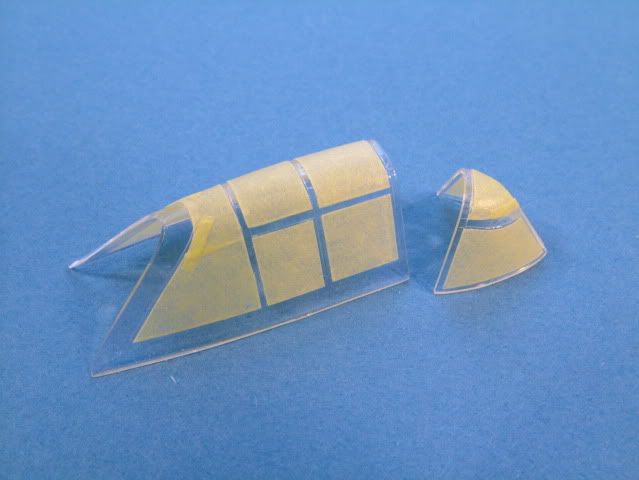
Cleaned off the sprue gates and carefully sanded back the attachment points to the clear parts.
Then some polishing with finer and finer grit and finally a dip into Future.
Ready for some masking when the Future has hardened.
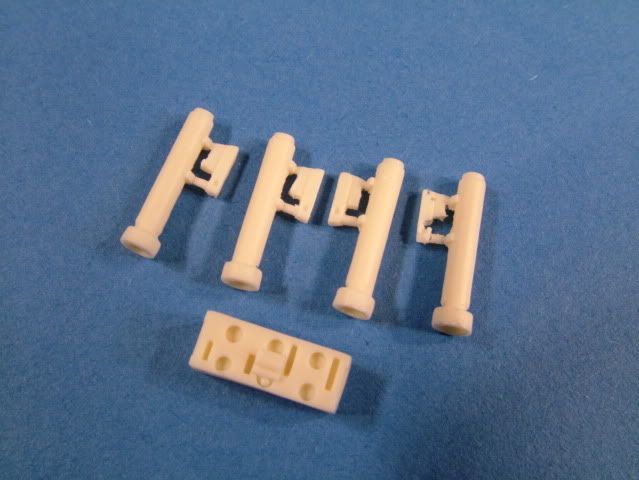
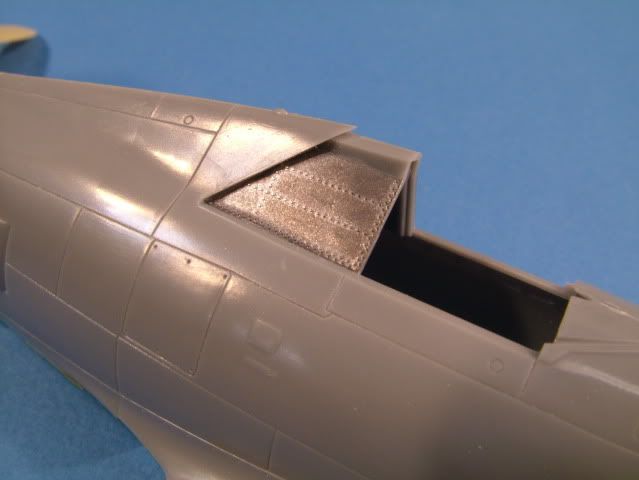
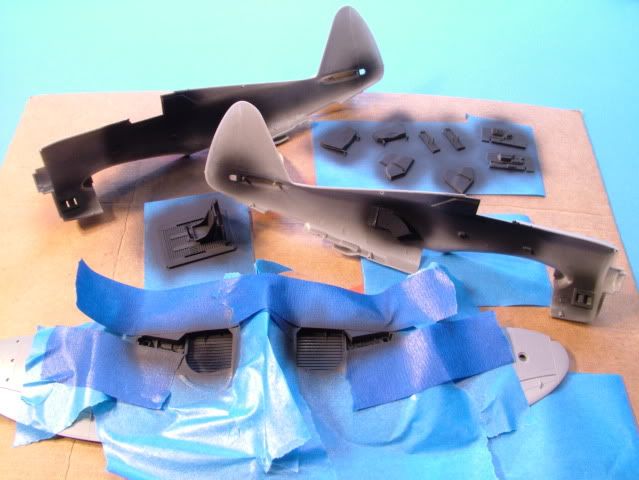
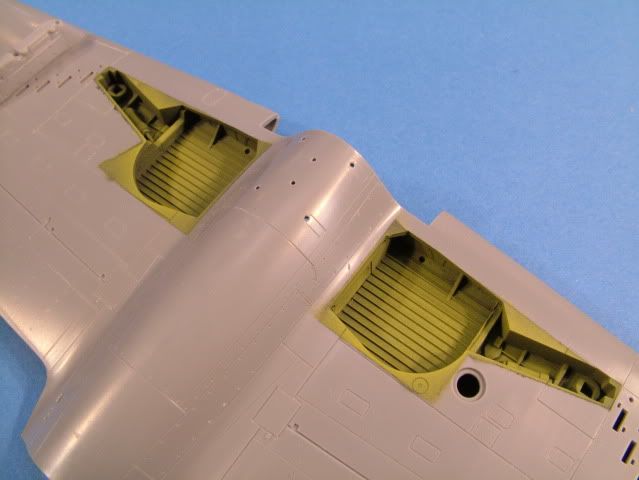
Completed the wing once the wheel wells were dressed up with PE side walls.
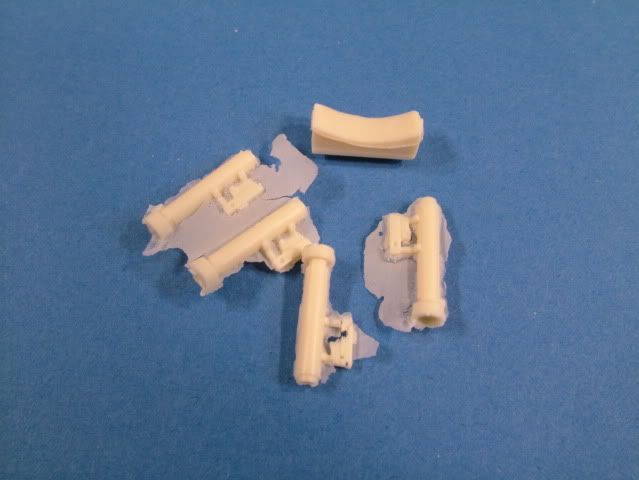
Drilled out various holes for the Dingy attachments and the Slipper Belly tank.
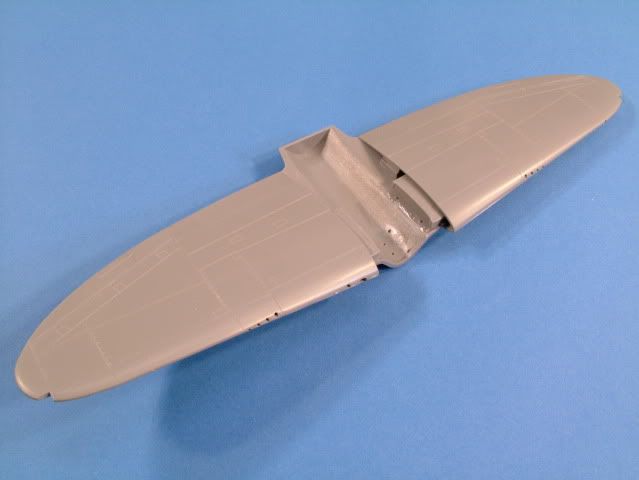
There are about 12 PE parts that make up the side detail of the wells.

Cleaned up the Rescue Dingue's and re-scribed the panel lines.
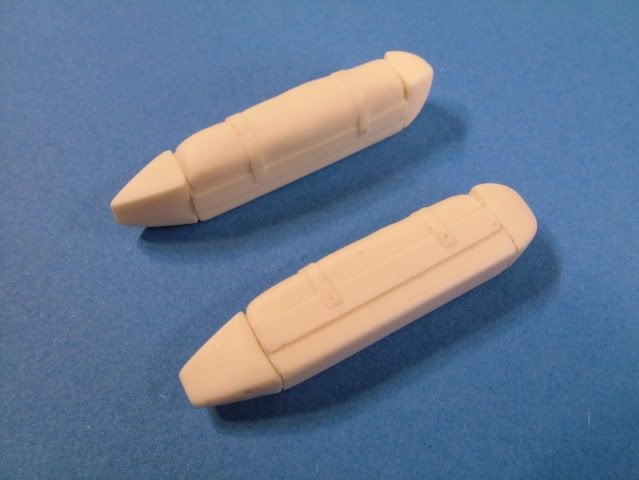
Should look something like this later on
From this:
to a pretty neat representation of the Belly Smoke Marker Flares:
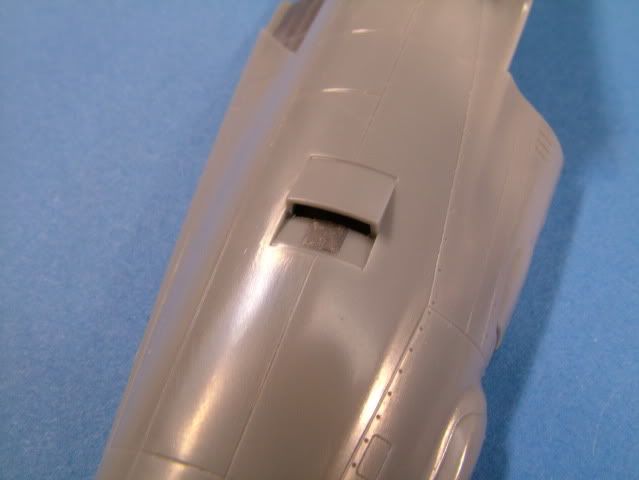
Interior ducting:
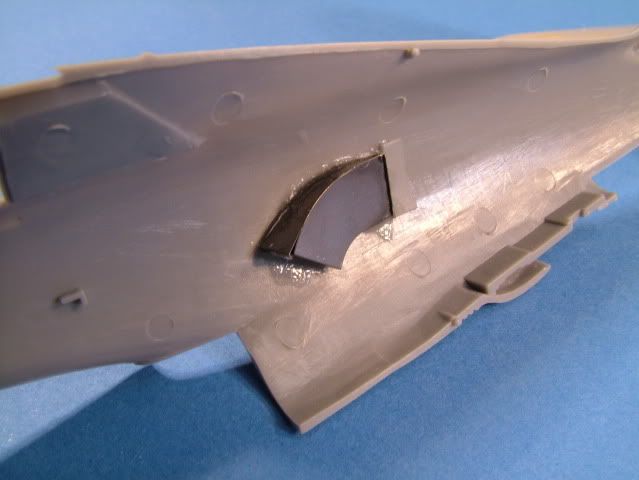
The other side of the duct, now has a small detail of a raised access panel:
PE details to the side window area:
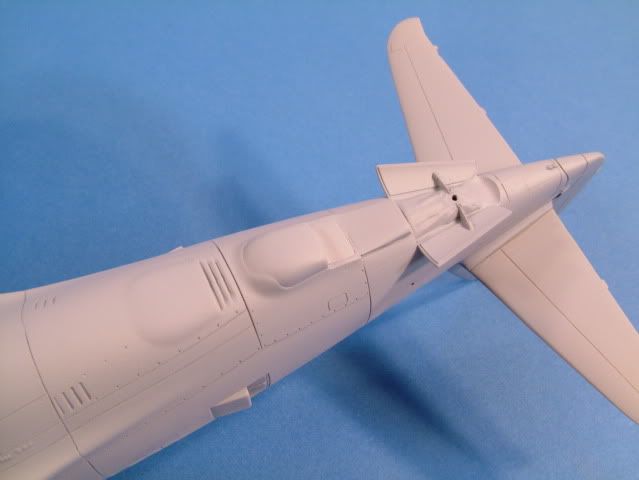
Grafted on the resin horizontal tail surfaces with thick Super glue and a shot of kicker.
A small brass tube was inserted to strengthen the overall construction:
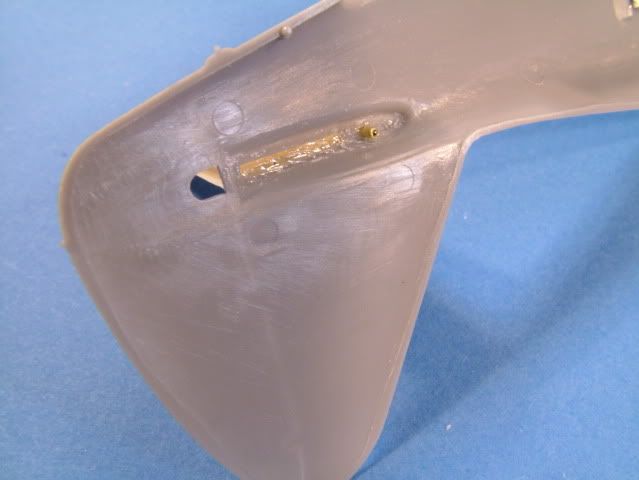
Created some small hinge points out of Evergreen Styrene:
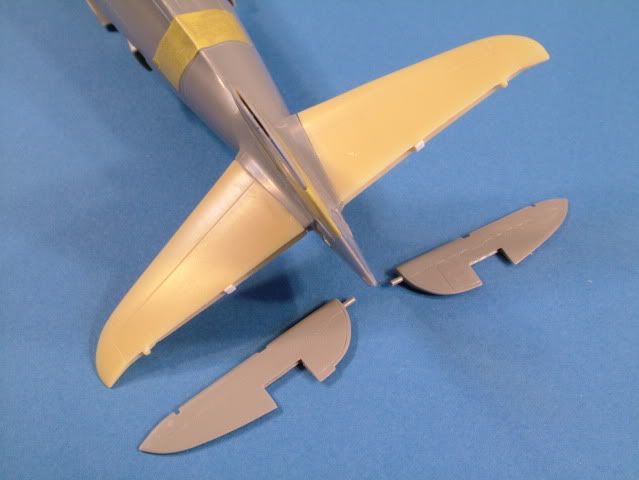
A slight droop of the Elevators is planned. The Control stick will be glued in a slightly forward position to ensure we stay true to the controls.

Additional interior PE detail to the Main Landing Gear doors:

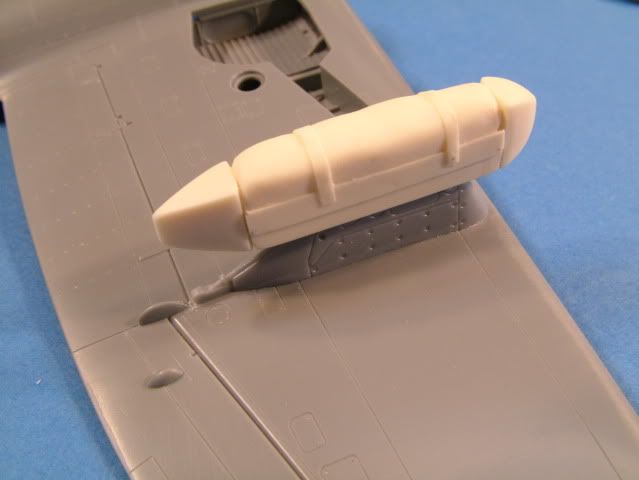
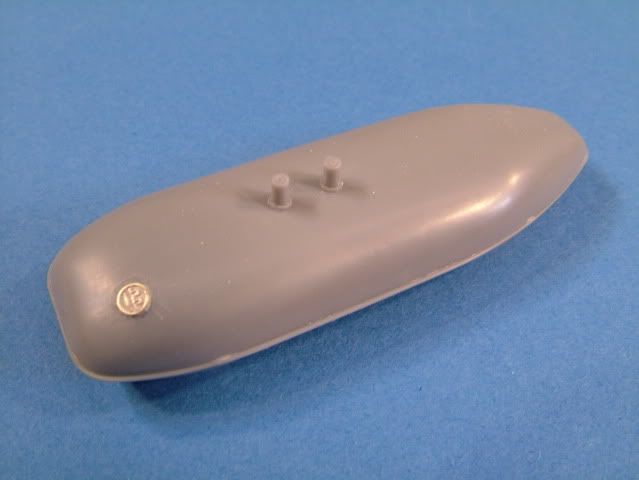
Belly tank completed and dressed up with a small gas cap:
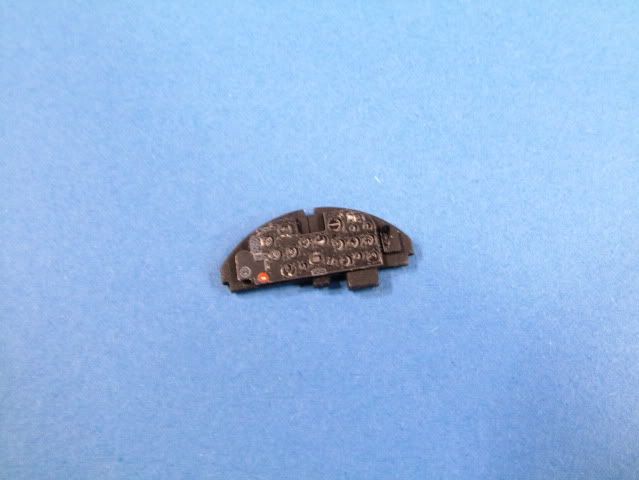
Instrument panel, still a couple more small details to go and some drops of Future on the dials to simulate the Glass to come:
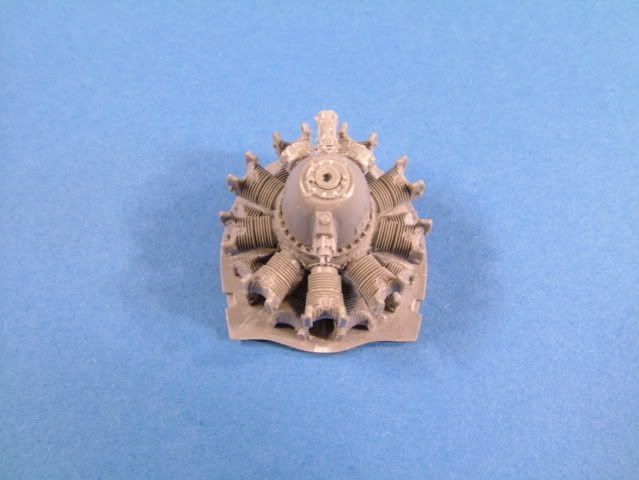
Assembly of the resin engine:
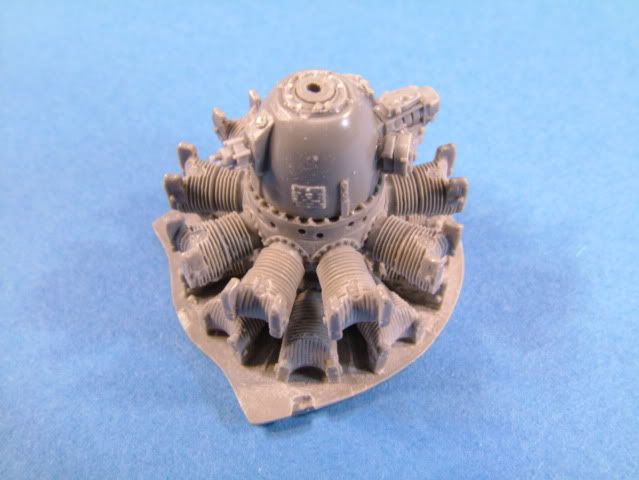
Magnetos and starter installed:
Some of the small parts, like the main gear were cleaned and ejection pin marks sanded down and filled.
Cleaned up and assembled the cowl, Started painting the silver rims for the wheels.
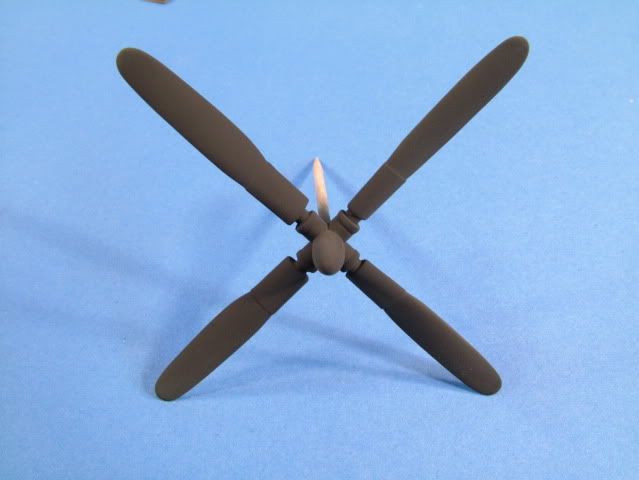
Assembled the propeller.
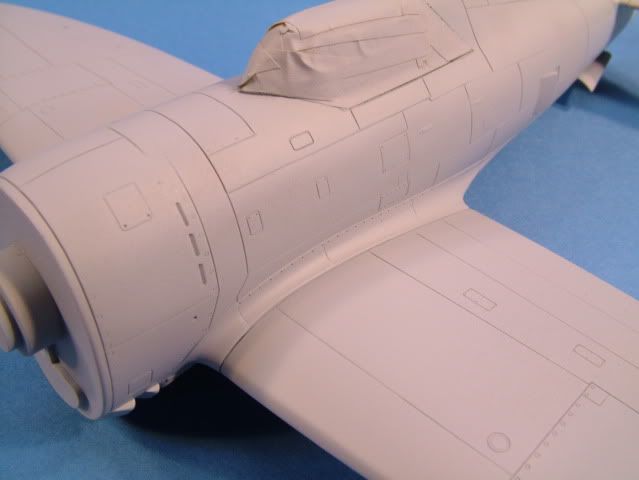
Masked up the canopy with the excellent pre-cut masks from Eduard.
Base-coat of Flat Black.
Light over-spray with Model Master Interior Green for the Cockpit parts.
The Gear Doors and Interior Wheel Wells were sprayed with Tamiya Yuck Yellow.
Airbrushed the first coat of Alclad II Duraluminum to the Engine.
Painted up the rubber with Tamiya NATO Black.
Completed first stage, coat of NATO Black for the Prop.
Completed the cockpit with some PE seat belts, small bits for the dials, and handles, various placards.
The interior was painted with Model Master Interior Green, then Tamiya Flat Black for the various panels and a final dry brush with some Model Master Silver.
I discovered that unfortunately the Clear Plastic rear glass is too thick to fit
in the "open" position,
so most of this fun detail is going to be quite hard to see once finished.

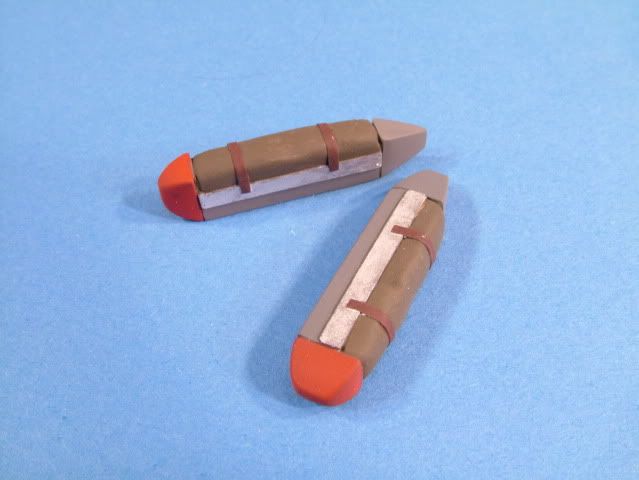
Painted up the rescue dingues.
Tamiya Green Drab for the float, Tamiya Hull Red for the leather straps, some Model Master silver for the rack and Tamiya Flat Red for the tip cone.
The top is Tamiya Dark Grey, all colors are based on very sparse historical information.
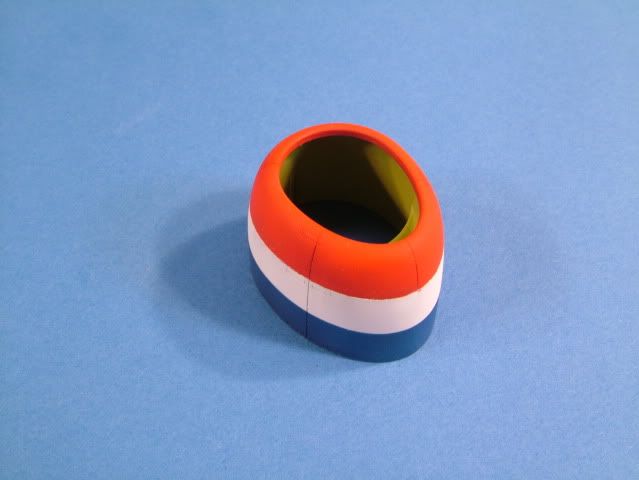
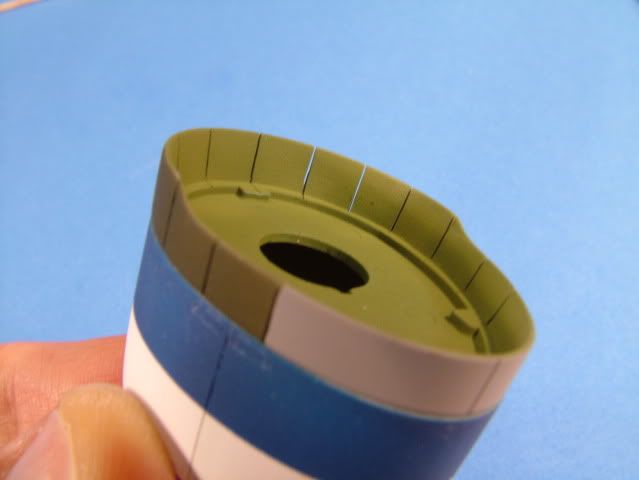
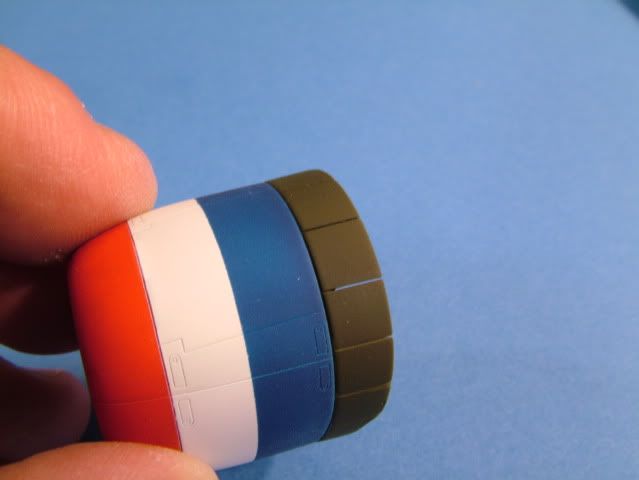
Painted up the cowling:
Tamiya Flat White was airbrushed on over all first, then taped off the front and airbrushed on Tamiya Flat Red,
then taped off all and painted the Blue with Mr. Color Dark Blue.
Purposefully left it a little blotchy and let some of the lighter areas show through.
A Clear Flat coat was then applied to protect the paintwork.
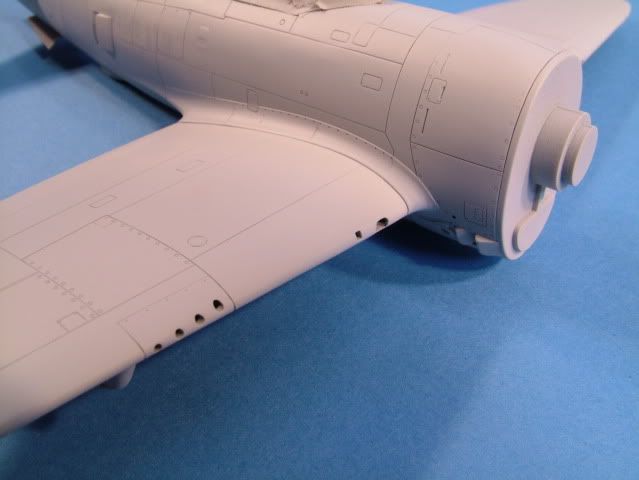
To add a little bit more detail, I used my razor saw and cut out the cowling flaps.
Back was painted with Model Master Interior Green.
Dry fitted:
Carefully aligned the fuse halves with the panel lines in mind and spot glued with Tamiya Thin.
Used some Super Glue on the "inside" to ensure nothing was left to chance and open up a seam later on.
Then went back and did a final all around glue and let harden.
Once hardened used some MDC polishing blocks and went after the seams.
No putty was used anywhere at this particular stage.
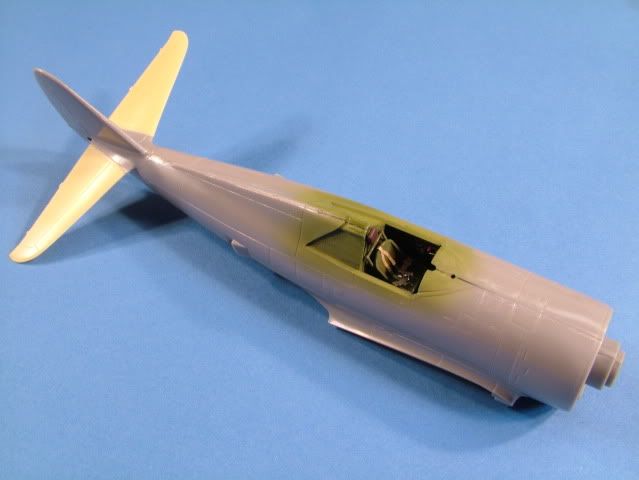
Installed the canopy with Gator Glue and used a little Tamiya Thinner on a Cotton bud to wipe away the excess after 5 minutes of dry time.
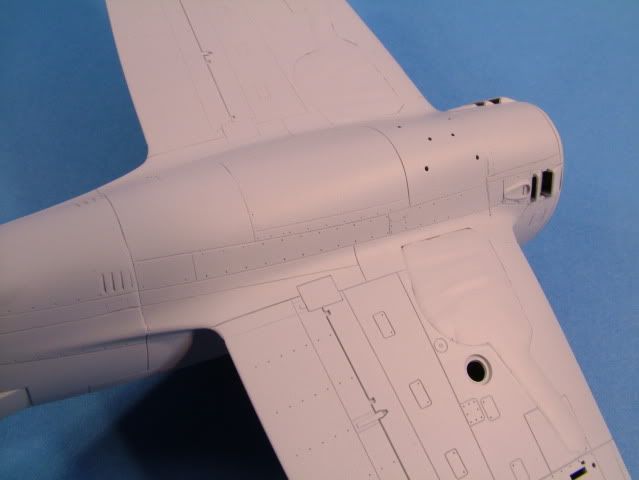
Considerable time was spent re-scribing panel lines across from side to side and on the bottom.
No putty was used on the main wing join, just was patient and took my time sanding carefully to get to best fit possible.
A coat of Tamiya Thin was applied for the wing join and tape spanned across to set correct wing dihedral.
The whole fuse was then polished up with a MDC 1200 grit sponge, the re-scribed panel lines were needed,
touched with Tamiya thin and allowed to pull through the lines via capillary action to get a nice clean panel line
The cowling is just pressed on for now.
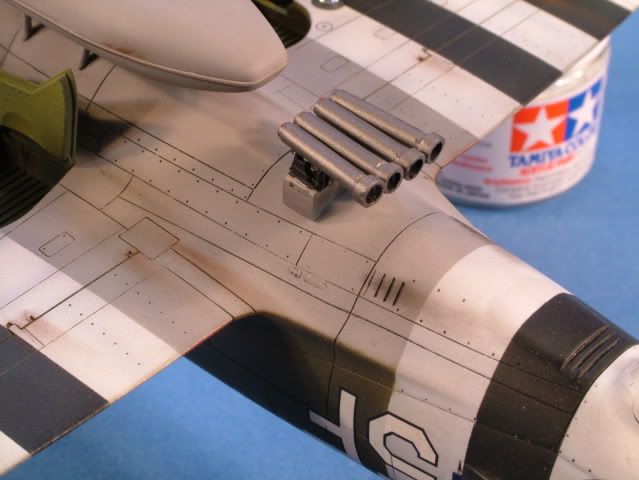
Used some 0.8 mm Brass Pipe and fashioned some wing guns.
Will only install 6 of the 8 guns as on most missions
fewer guns were carried by these aircraft on missions to ensure weight savings and as such longer loiter time over a crash victim.
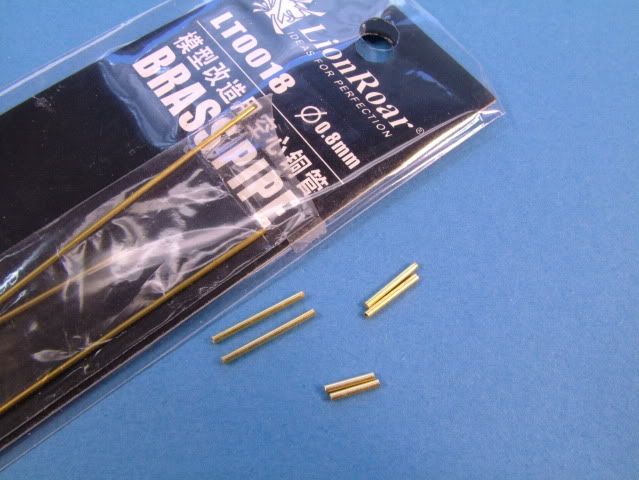
Just press fitted on, the remaining "hole" will be faired over with some foil to simulate the normal patch applied in the field.
You can see the panel lines re-scribed from top of wing towards bottom.

The whole airframe was then rubbed down with some Poly Scale plastic prep
From this point forward start using a rubber "doctors" glove as not to introduce greasy finger prints.
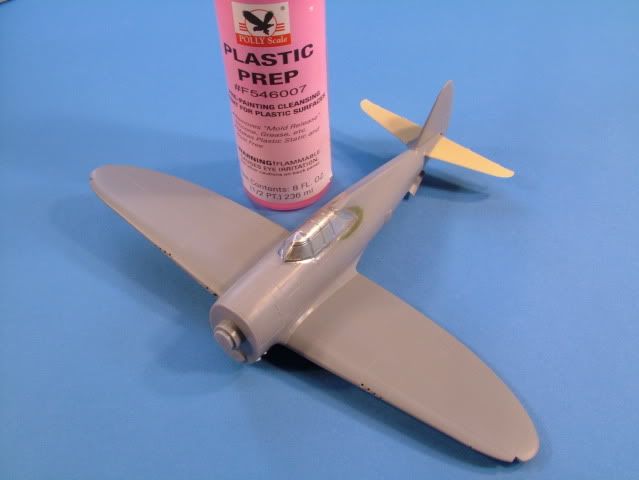
Ready for a primer coat.
Polished up the complete airframe and then shot a coat of Mr. Surfacer 1200

A couple small areas of panel lines where fixed now that they are a bit more visible and corrected for alignment.
The main weel wells are masked off with 3M White Tack
Pre-shade with Tamiya Flat Black.

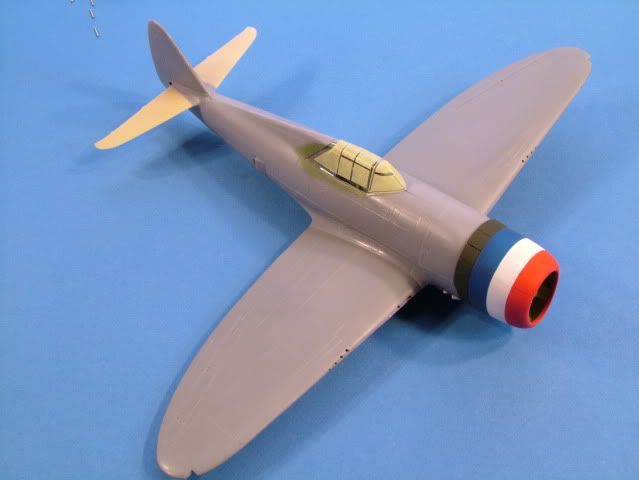
Interestingly enough the kit decals show the Yellow edging over the main wing top and bottom.
In this magazine this is not the case. Also several pictures show different renditions of the invasion stripes.
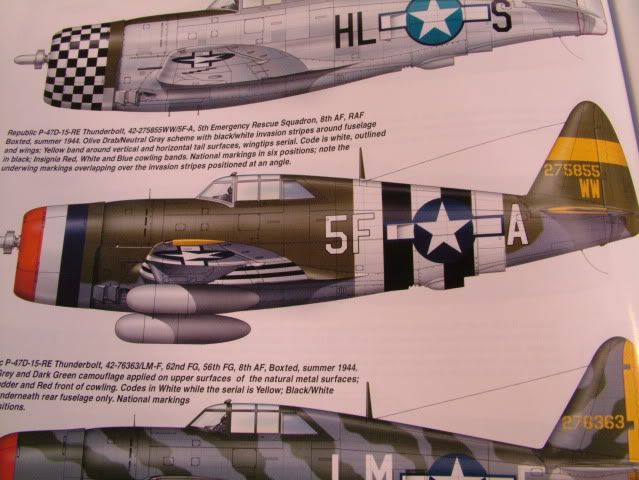
Sticking with the magazine version.
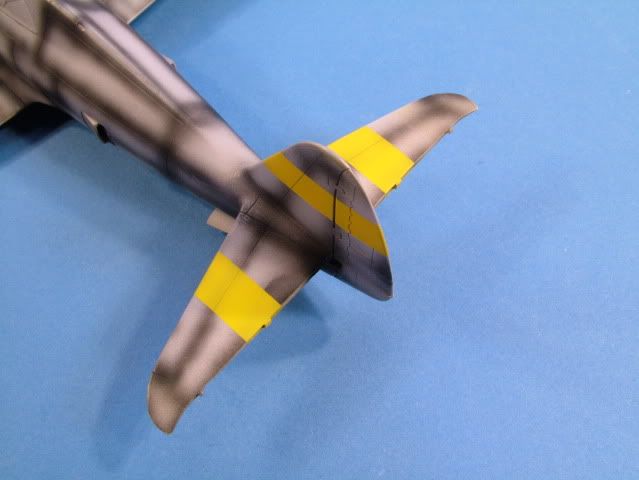
First up the Yellow tips and tail stripes.
Used some Tamiya Flat Yellow, with a 2 drops of Tamiya Flat Red to dull down the Yellow to a more WWII scale like color.
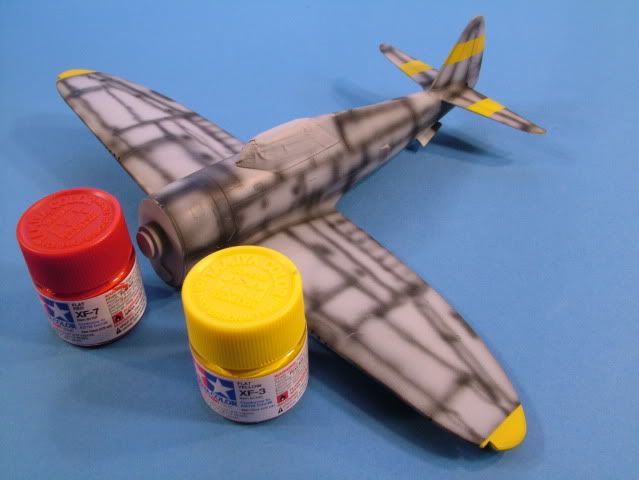
The paint was sprayed on in several layers very thin and letting some of the pre-shading come through.
Quite hard to tell in the pictures but very happy with my achievement.
Next was to airbrush on the White fields. I used Mr. Color Flat White as this paint is very nice to work with when thinned down and a few drops of
Mr. Retarder provides you with the ability to do some neat blotchy appearances and simulates the chalky White paint quite nicely.
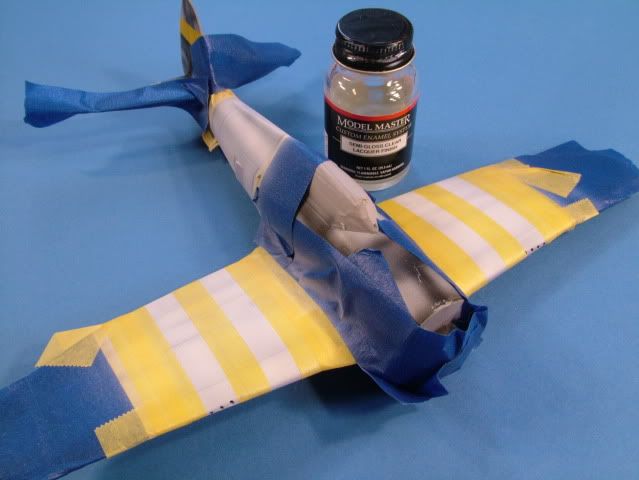
Masked off the "White Bands" by evenly spacing the Tamiya Tape and removing the "Black Field".
Airbrushed on a thin coat of Model Master Semi-Gloss Clear to seal the edges of the tape and as such prevent any bleed through of the Black via a panel line.The WWII Color photograph at the beginning of this build shows some very neat Invasion Stripe application.
This is not always the case on many other aircraft examples.
Airbrushed on the "Black" with 98% Tamiya Flat Black and 2% Tamiya NATO Black to tone down the stark Black and give it a bit of a "scale effect" and blotchiness.
Started following the panel lines and then thinned down the paint even more and did a quick over spray.
First pass and eye ball check for effect.
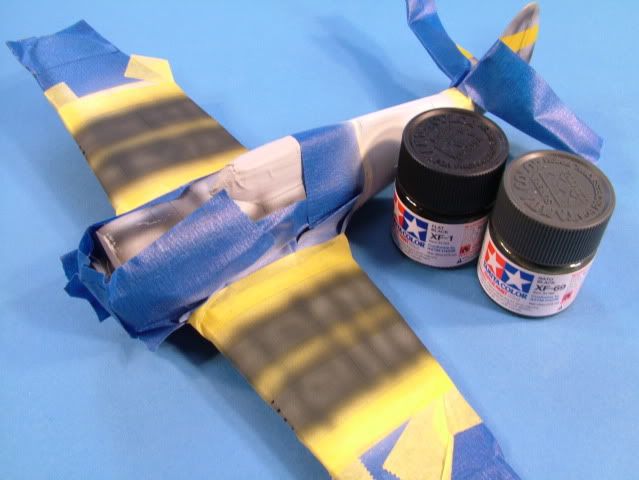
After the quick thin paint passes.
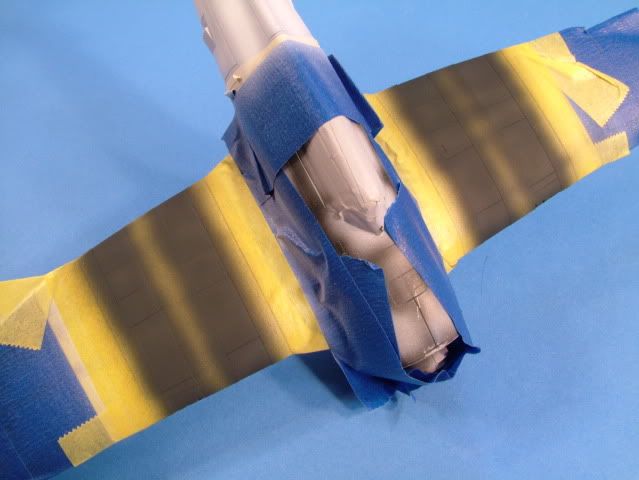
Partially unmasked.
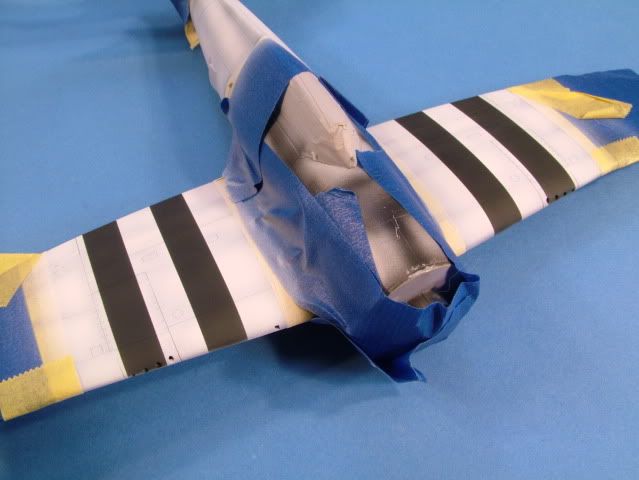
Airbrushed on a semi flat coat over the finished invasion stripes as to protect them.

Took a lot of measuring and using the decals to ensure I didn't inadvertently get it crooked.
loads of tape and patience to get it right.
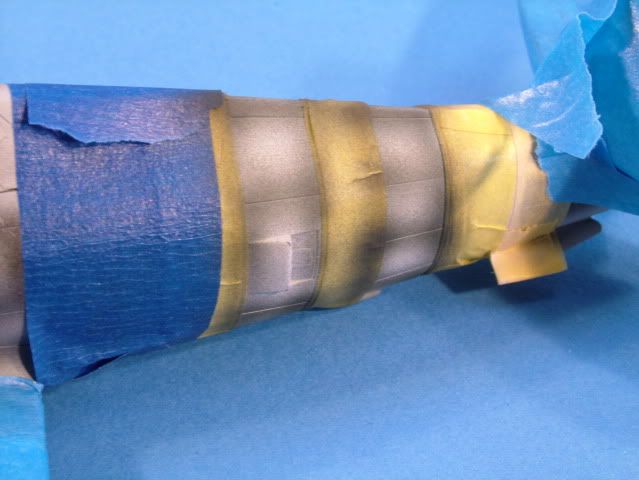

Checked all the lines and ensure nothing left to chance airbrushed on a light layer of semi Gloss over the tape lines.
Left that to dry for a couple hours and had a small break at work so might as well bite the bullet.
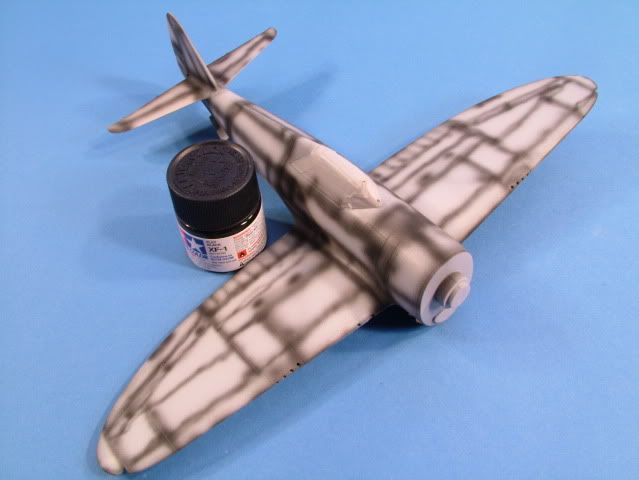
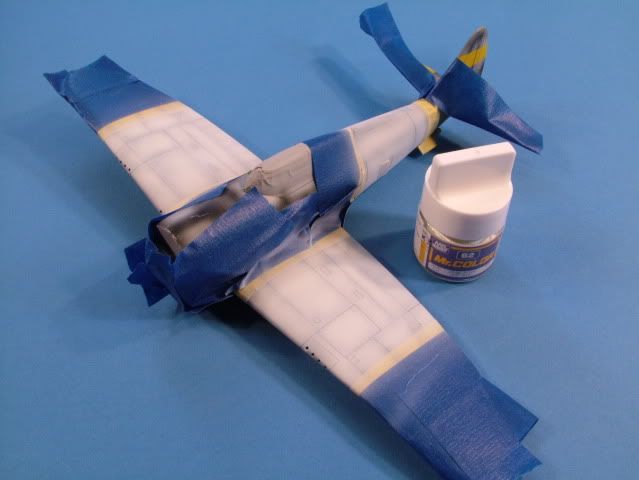
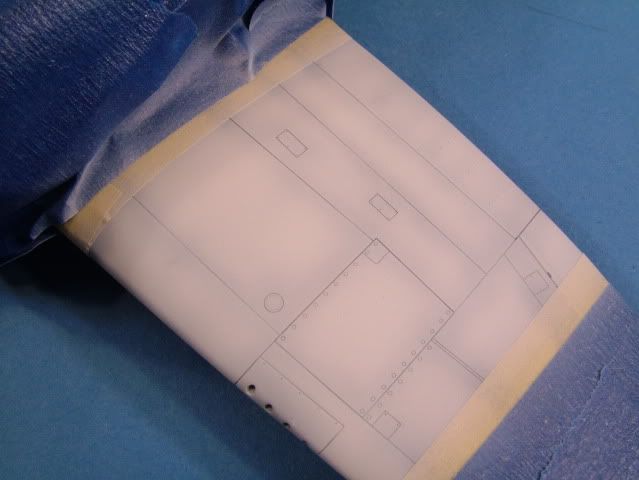
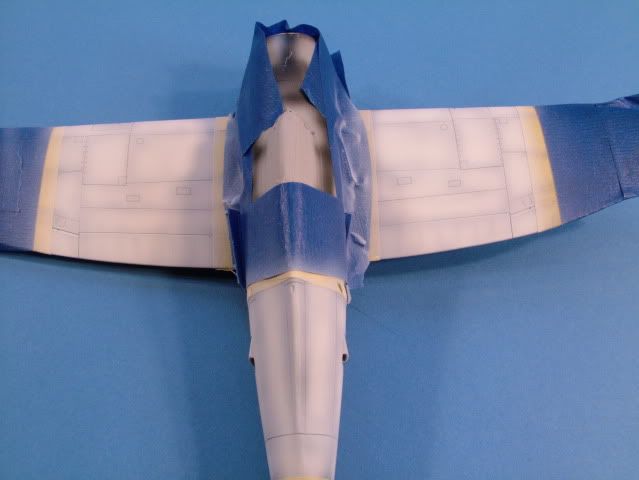
Airbrushed on a light layer of Tamiya Light Grey XF-19, concentrating to stick with the center area of the panels.
Then dry blow the sprayed areas and then did a very light coat at a reduced paint to thinner and blended in.
Left that to dry for 30 minutes to see the effect.
Went back in with a 10% mix of Flat White to the XF-19 and highlighted certain panels and inspection hatches.
Left that to dry and then went back with a 10% addition to the XF-19 of XF-71 SNJ Grey and post shaded the panel lines at 5 psi.

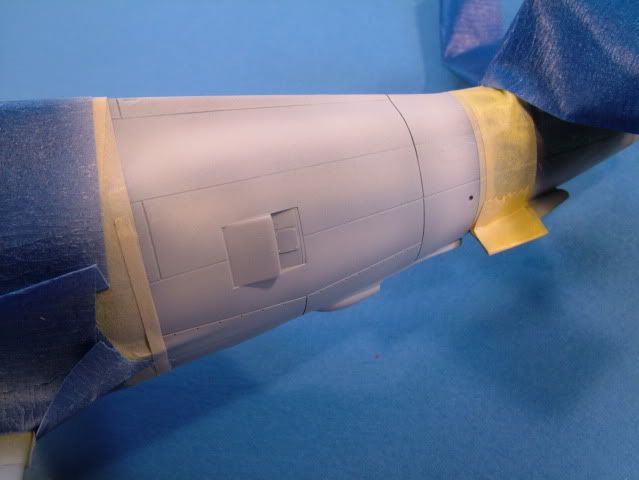
Worked
the Khaki Drab for the top. Similarly as I did to the bottom.
Started in the center and worked slowely to blend in the various
fades.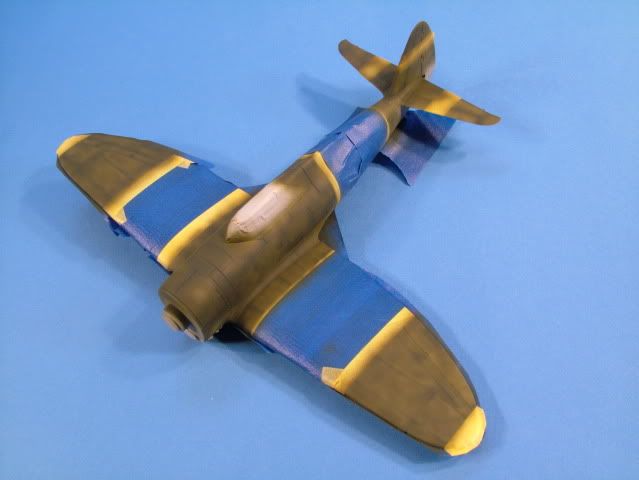
All
the color's used that were blended to get that scruffy look.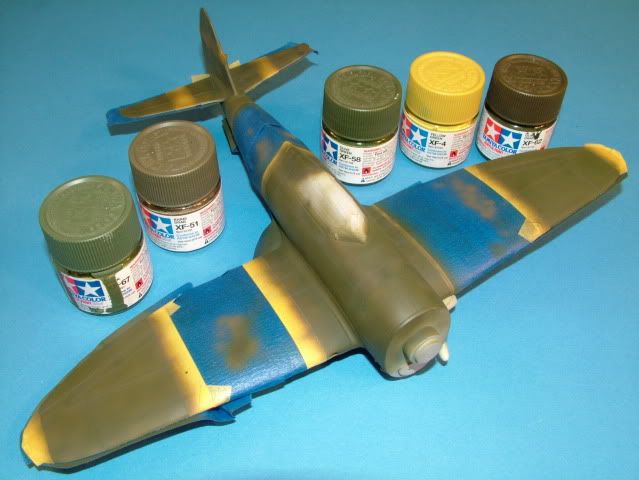
Pretty
difficult to see but there are some nice blends overall but quite happy
with results.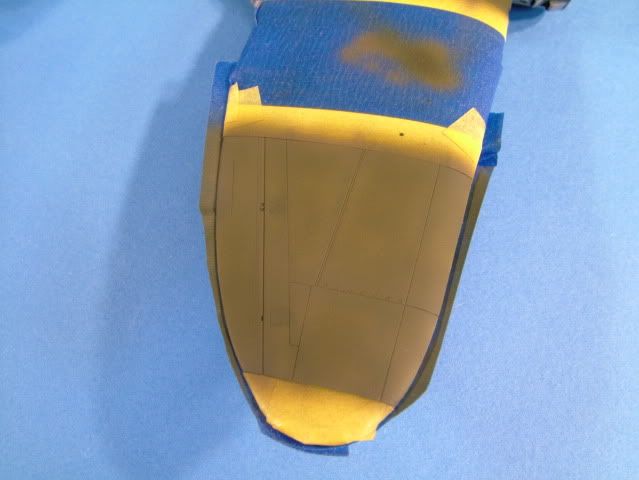
First
semi gloss coat on: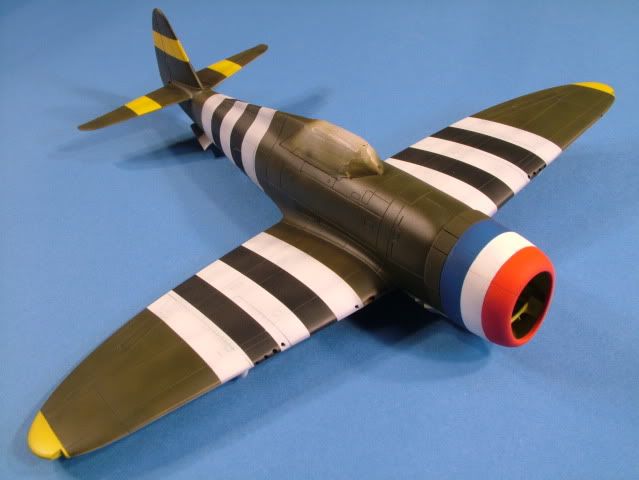
Cowl
is just lightly pressed on.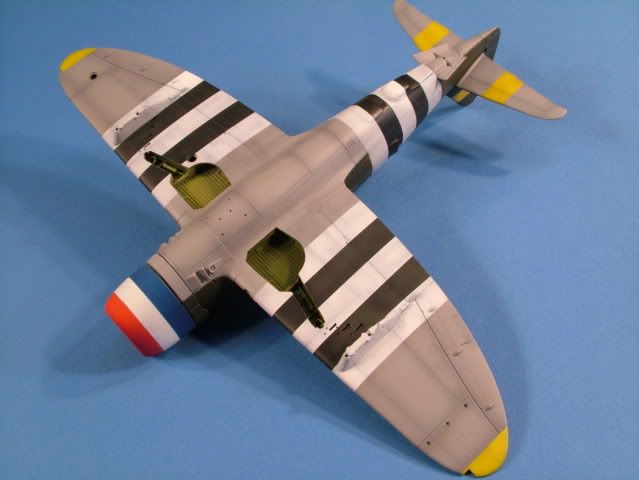
Airbrushed
the Gloss on without any thinning at 20 psi just a couple passes.
I left
the first coat to dry for 30 minutes and then did one more coat at same
psi.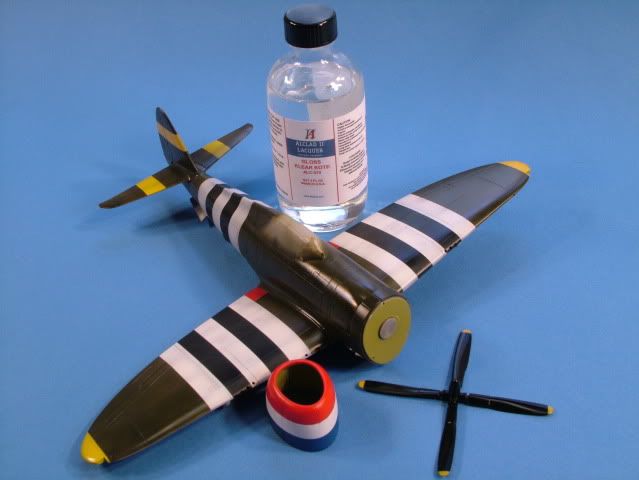
Personally
I like to airbrush on Gloss Coats as I feel I have more control over the process
compared to brush coating Future.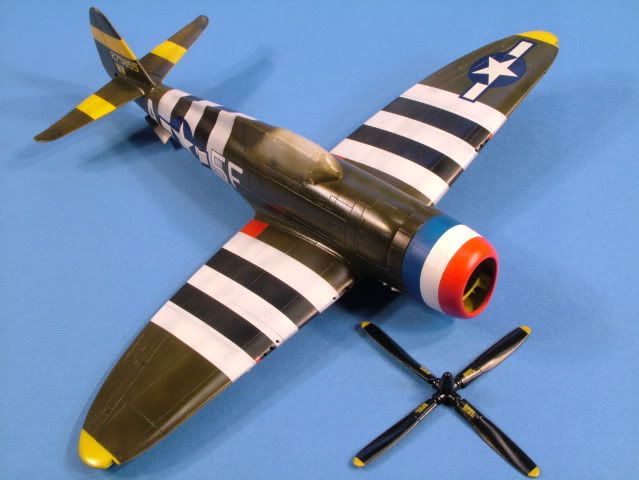
It
dries very quickly and allows soft handling within an hour when wearing a rubber
glove.
I
started decal-ling within less than 3 hours and used both Micro set and Micro
Sol without any ill effects on the Gloss coat.
Although to be on the safe
side I would highly recommend as a good idea to give any
clear coat a full overnight cure.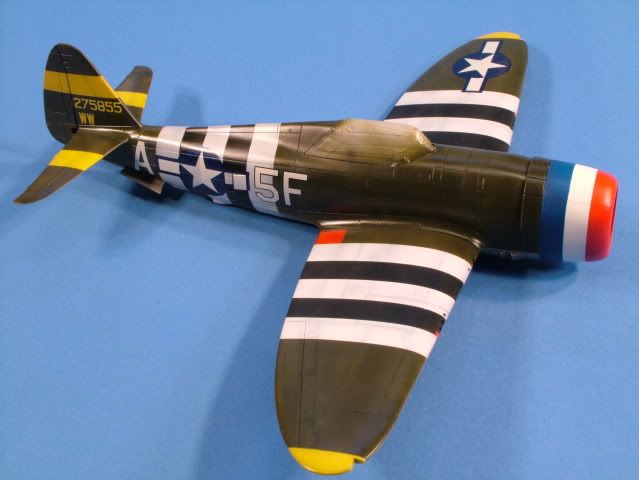
Built
some push rods from brass rod and inserted in some small holes.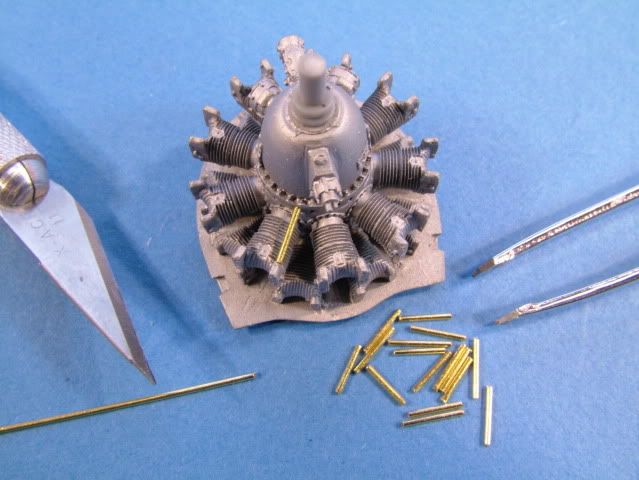
All
push rods installed.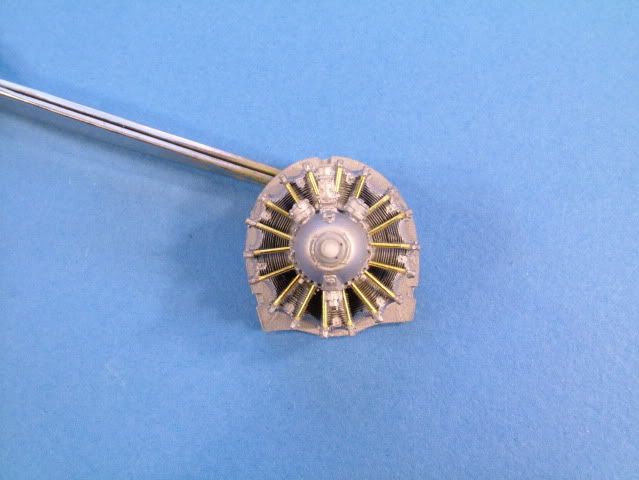
Painted
the rods a Tamiya Flat Black and gave the cooling fins a wash of Dark Wash from
Mig.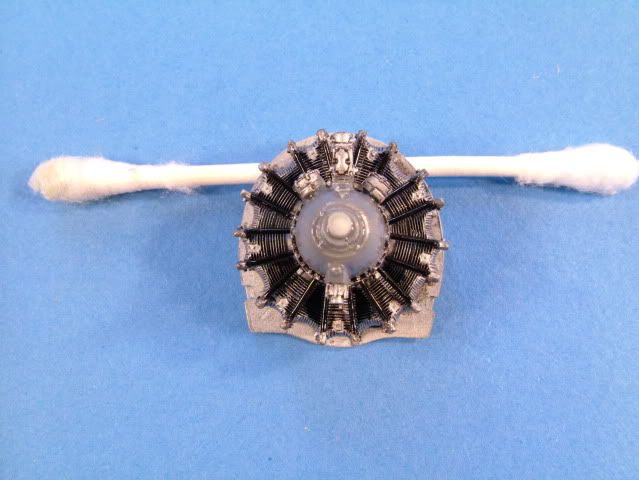
The
reduction Gear Housing was painted a gloss gull gray and washed.
On
to finishing up the Main Landing Gear.
Used some Mig "Brick Dust" and
rubbed it into the rubber threads, then used my finger and removed some of the
sides and on the contact area.
Then set the colored pigment in place with
Mig Pigment Fixer solution.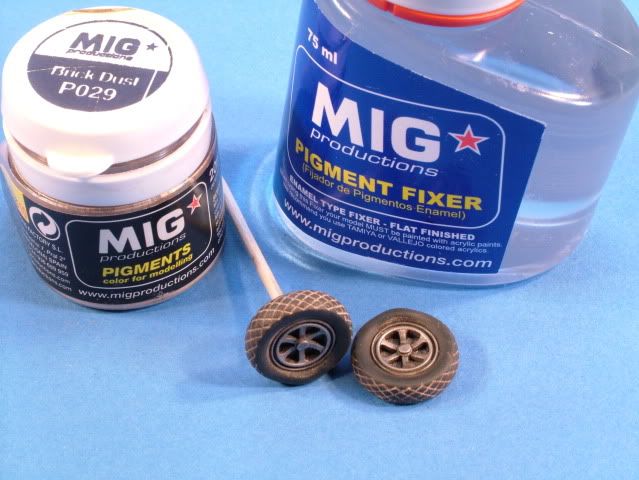
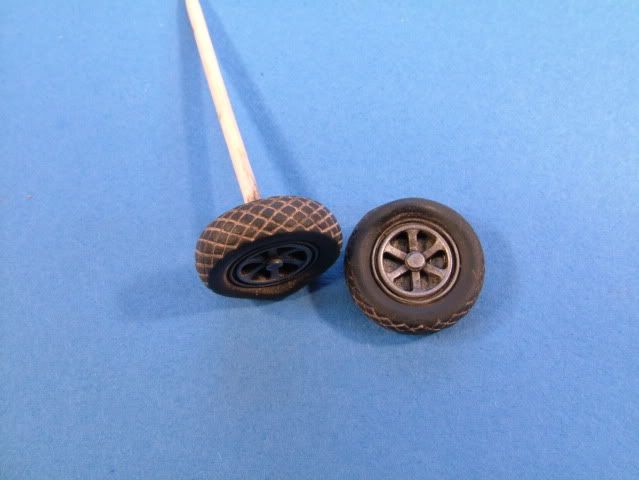
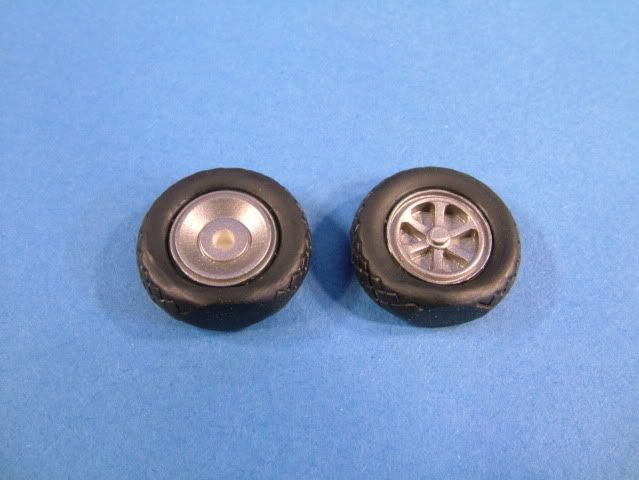
Main
Gear Completed.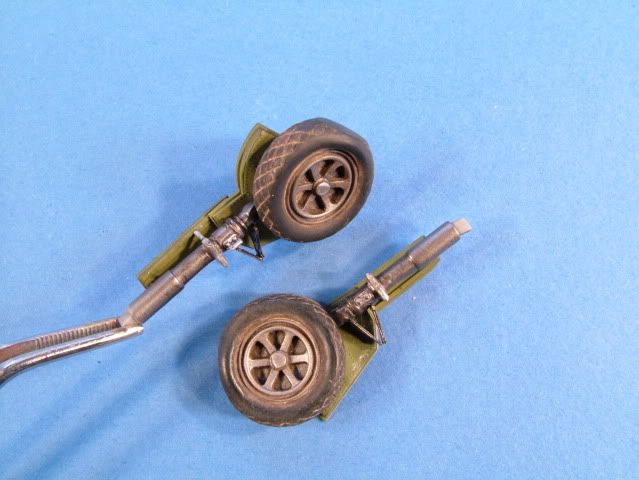
Drilled
out the navigation tip lights with a pin vise. Then inserted some Tamiya
Clear Red and Clear Green.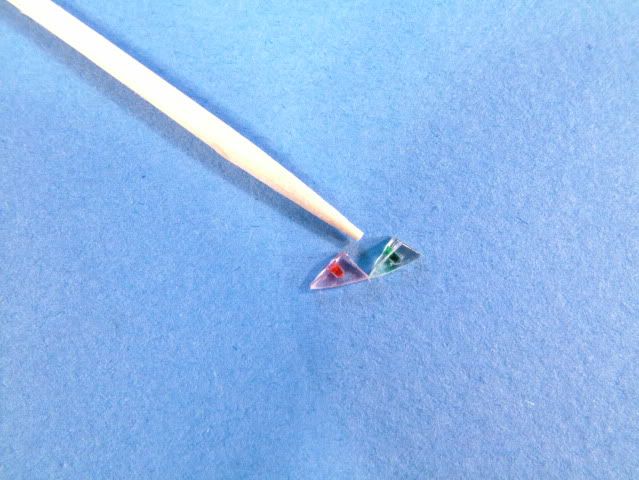
Completed
the Smoke Marker Flares.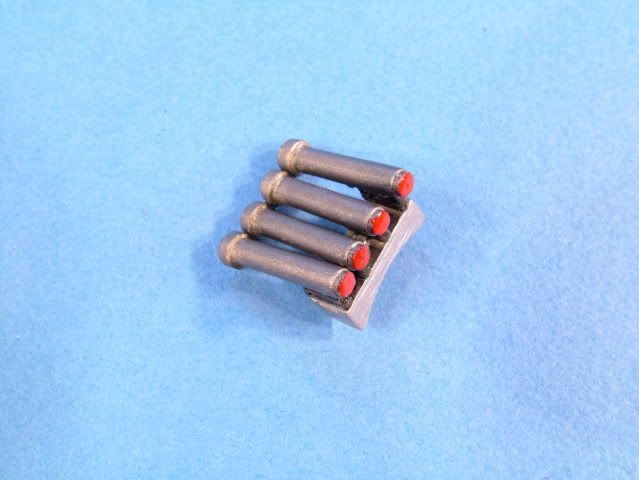
All
the remaining parts to be installed.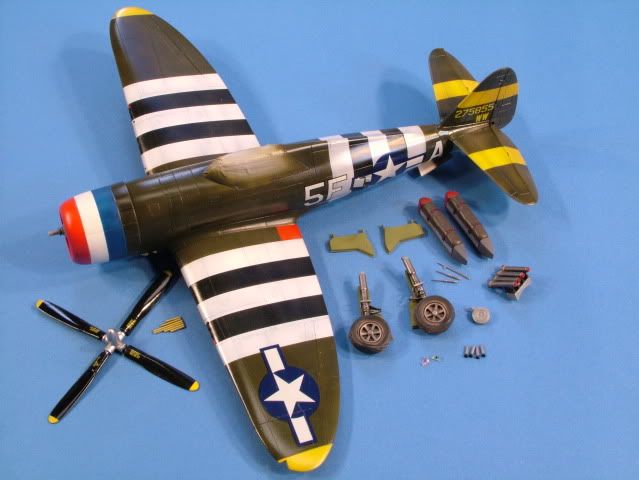
Promodellers
Black Wash on top.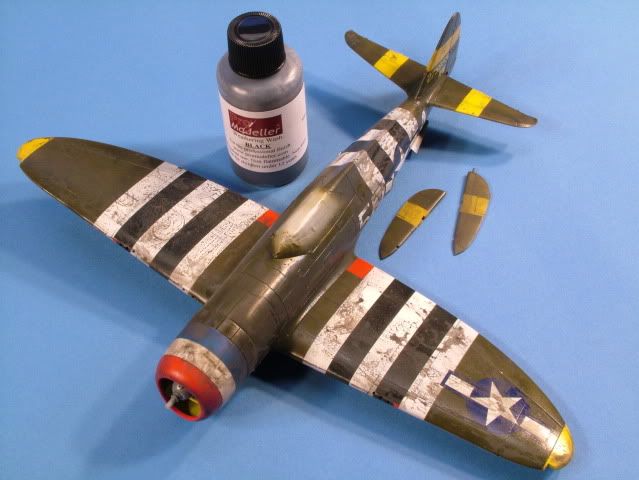
and
on the bottom: